Bruno API Testing: Build a Project from 0 to 1
Introduction
Why Not Use Postman and Insomnia?
- Regarding Postman: In May 2023, Postman announced the gradual phasing out of the Scratch Pad model with offline capabilities. Most functions will be shifted to the cloud, requiring users to log in for access. (Limited functionality is available without logging in, but the extent of data upload to the cloud during testing, compromising security, remains uncertain.)
- About Insomnia: With the release of version 8.0 on September 28, 2023, Insomnia intensified its reliance on the cloud. Users must log in to utilize the full functionality of Insomnia. The existing Scratch Pad features are restricted without login. (The security implications of potential data transmission to the cloud during testing without confirmation remain unclear.)
Therefore, an alternative solution that isolates API workspace data from third-party servers is necessary, with Bruno emerging as one feasible substitute.
Why Choose Bruno
Official Documentation: https://github.com/usebruno/bruno/discussions/269
Comparison with Postman: https://www.usebruno.com/compare/bruno-vs-postman
Open source, MIT License
Cross-platform support (Mac/Linux/Windows)
Offline client with no plans for cloud synchronization
Supports Postman/Insomnia script import (limited to API request scripts, excluding test scripts)
Relatively active community, with a clear product development roadmap
Building a Bruno API Automation Test project from 0 to 1
This article focuses on leveraging Bruno’s features to construct an API automation test project from scratch.
For Bruno installation and basic usage, please refer to: Introduction to using Bruno as a postman replacement
Project Structure
The structure of a Bruno API automation test project is as follows:
Bruno-demo
├── README.md // Project documentation file
├── package.json
├── package-lock.json
├── Testcase // Test case folder
│   └── APITestDemo1.bru // Test case file 1
│   └── APITestDemo2.bru // Test case file 2
│   └── bruno.json // Bruno COLLECTION configuration file
│   └── environments // Different test environment folder
│       └── dev.bru // Test environment configuration file
│   └── Report // Test report files
│       └── report.json // JSON format report file
├── .gitignore
└── node_modules // Project dependencies
Project Setup Preparation
Create Project Folder
mkdir Bruno-demoProject Initialization
// Navigate to the project folder
cd Bruno-demo
// Initialize the Node.js project
npm init -y
Install Bruno CLI Dependencies
// Install Bruno CLI
npm install @usebruno/cli --save-dev
Bruno CLI is the official command-line tool provided by Bruno. It allows easy execution of API collections through simple command-line commands. This tool facilitates testing APIs in different environments, automating testing workflows, and integrating API testing with continuous integration and deployment workflows.
Writing API Test Cases with Bruno
Create Test Case Directory
- Run Bruno app to the homepage
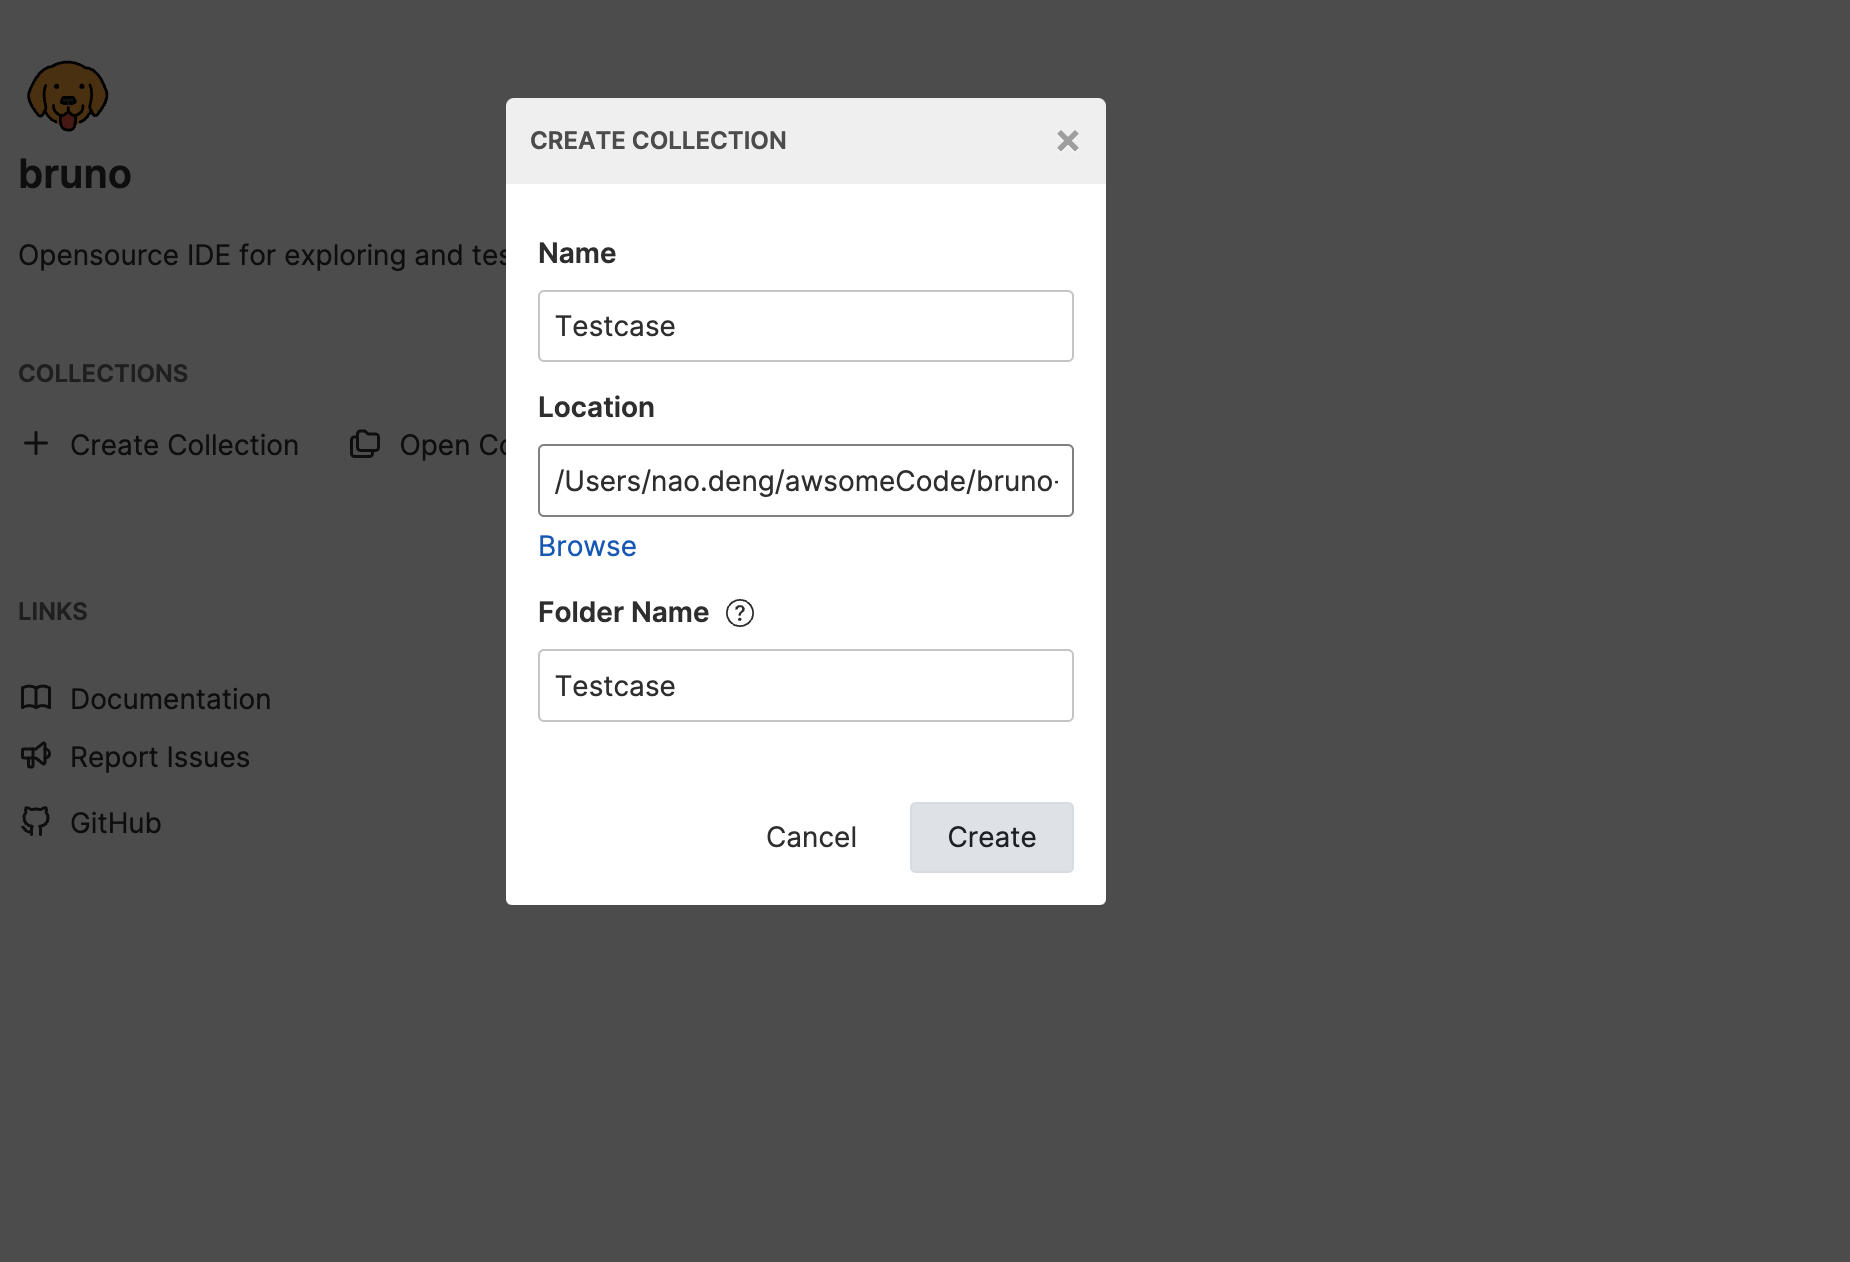
- Create a COLLECTION named Testcase, and choose the project folder created above as the directory for the COLLECTION.
Create a GET Request Test Case
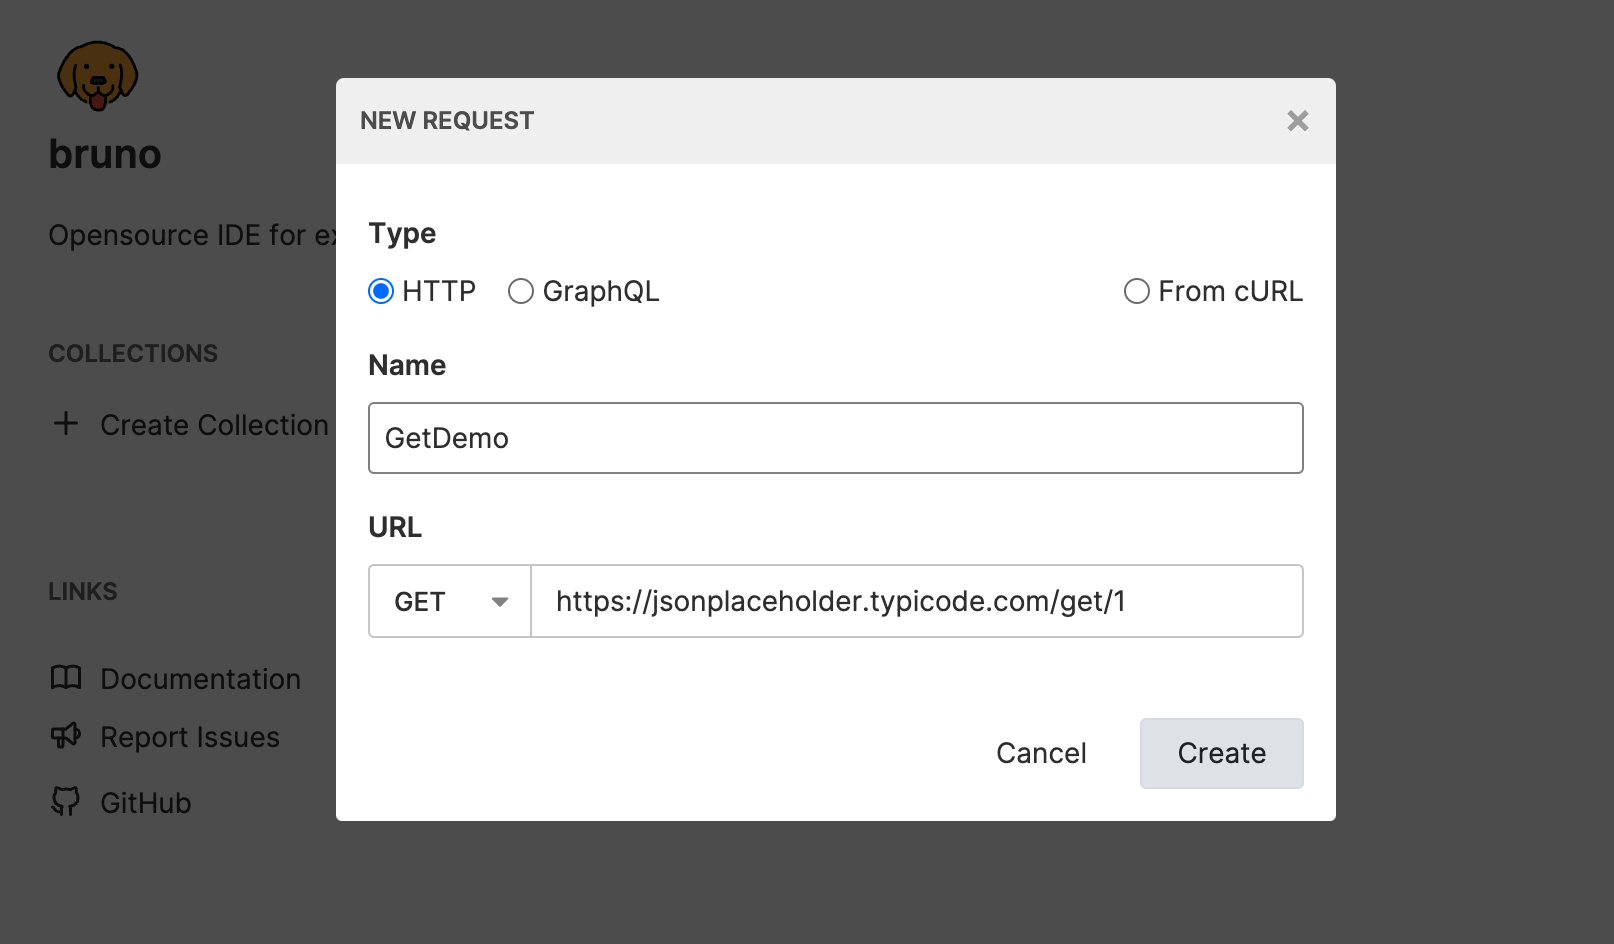
- Click the ADD REQUEST button under the Testcase COLLECTION to create a new GET request.
- Enter the request name as GetDemo and the request URL as https://jsonplaceholder.typicode.com/posts/1.
Adding Test Assertions to the GET Request
Using Bruno’s Built-in Assert for Test Assertions
-
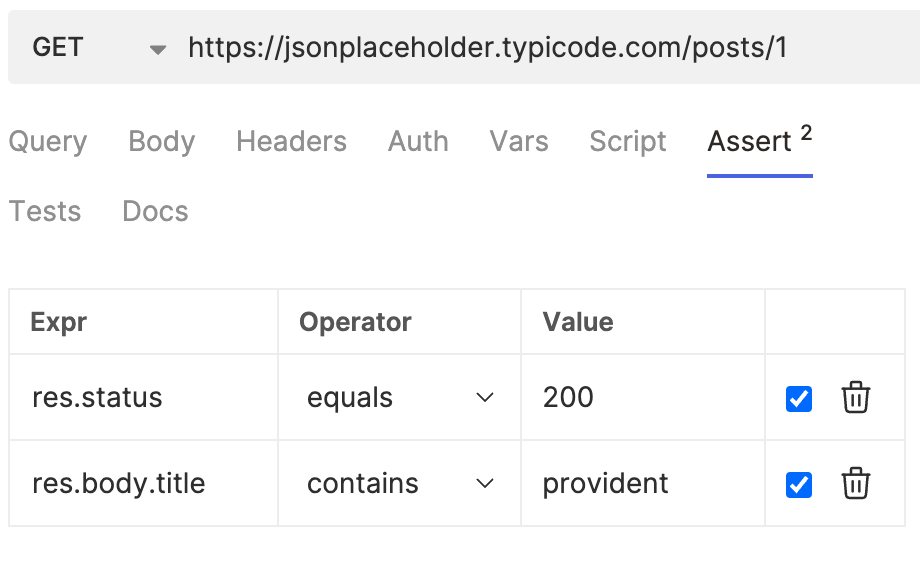
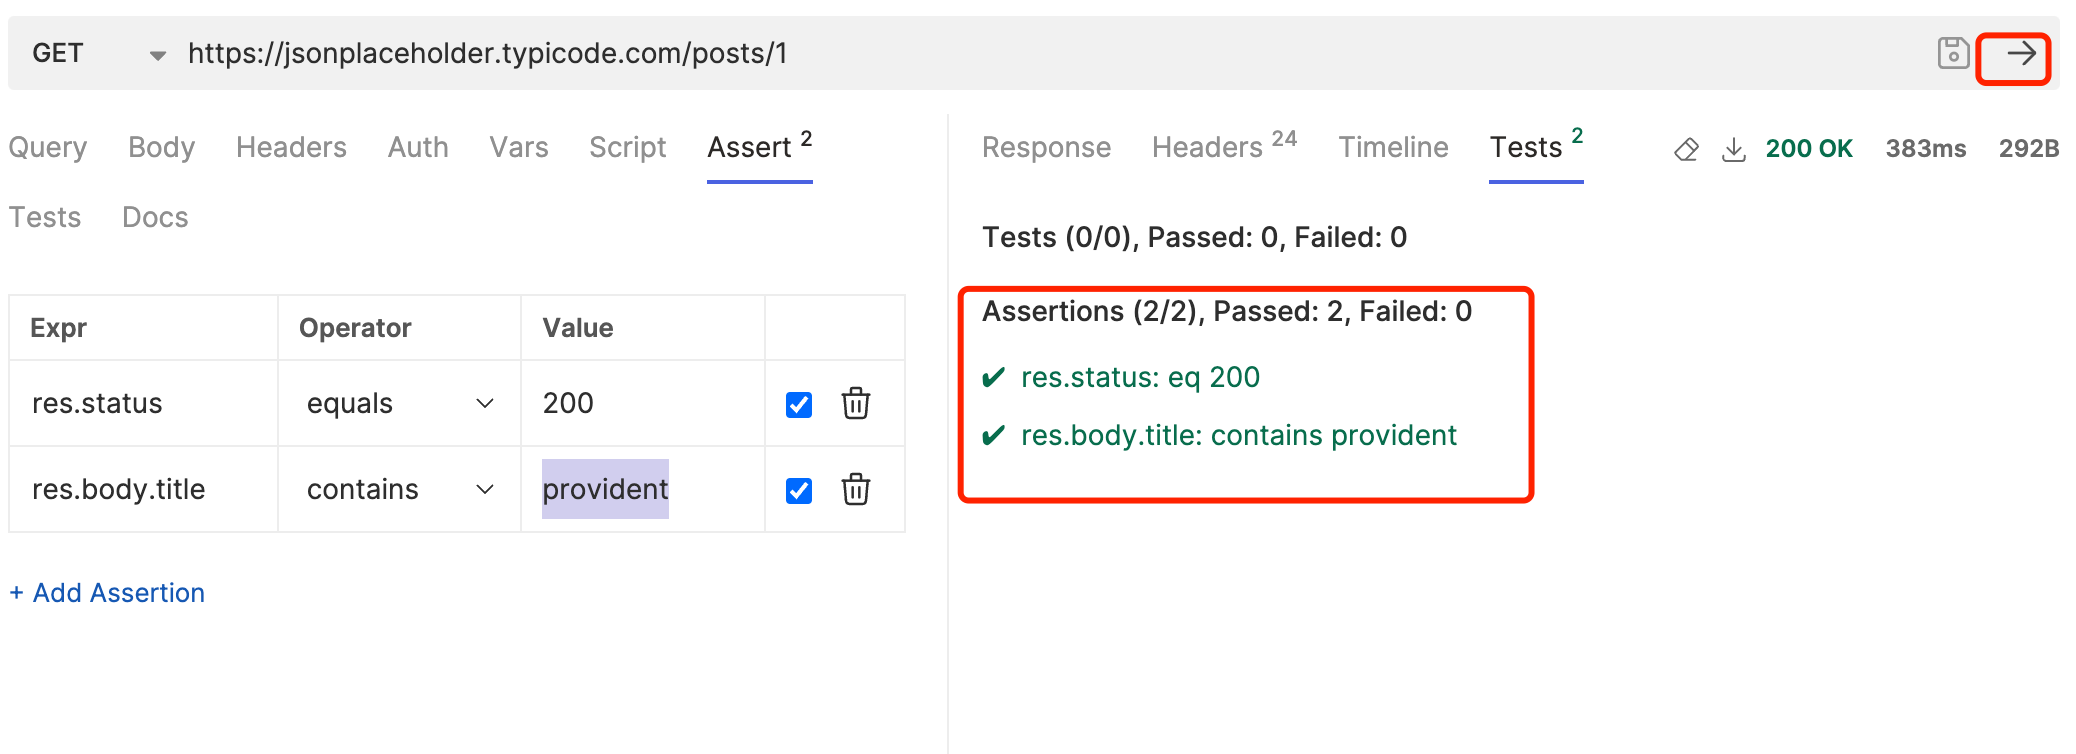
Click the Assert button under the GetDemo request to enter the test assertion editing page.
-
Enter Assertion 1: Response status code equals 200. Assertion 2: The title in the response body contains “provident.”
-
Debugging Assertions: Click the Run button in the upper right corner to execute the assertions and check if the results meet expectations.
Writing Test Assertions Using JavaScript
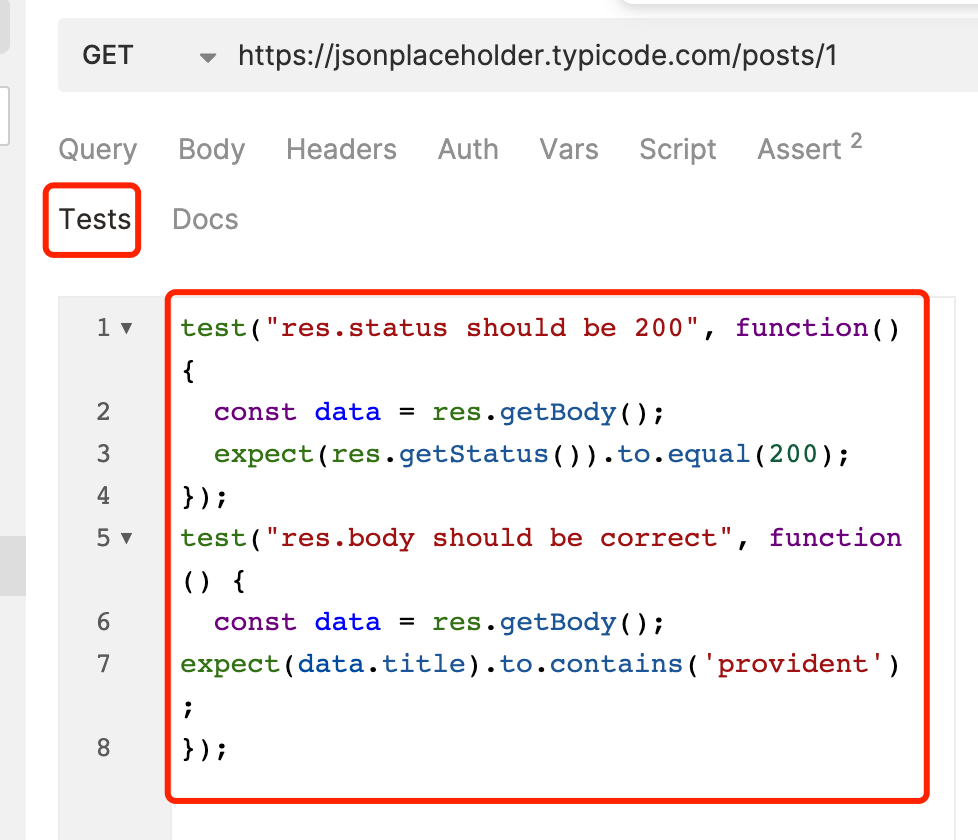
- Click the Tests button under the GetDemo request to enter the test script editing page.
- Enter the script code, Assertion 1: Response status code equals 200. Assertion 2: The title in the response body contains “provident.”
test("res.status should be 200", function() {
  const data = res.getBody();
  expect(res.getStatus()).to.equal(200);
});
test("res.body should be correct", function() {
  const data = res.getBody();
  expect(data.title).to.contains('provident');
});
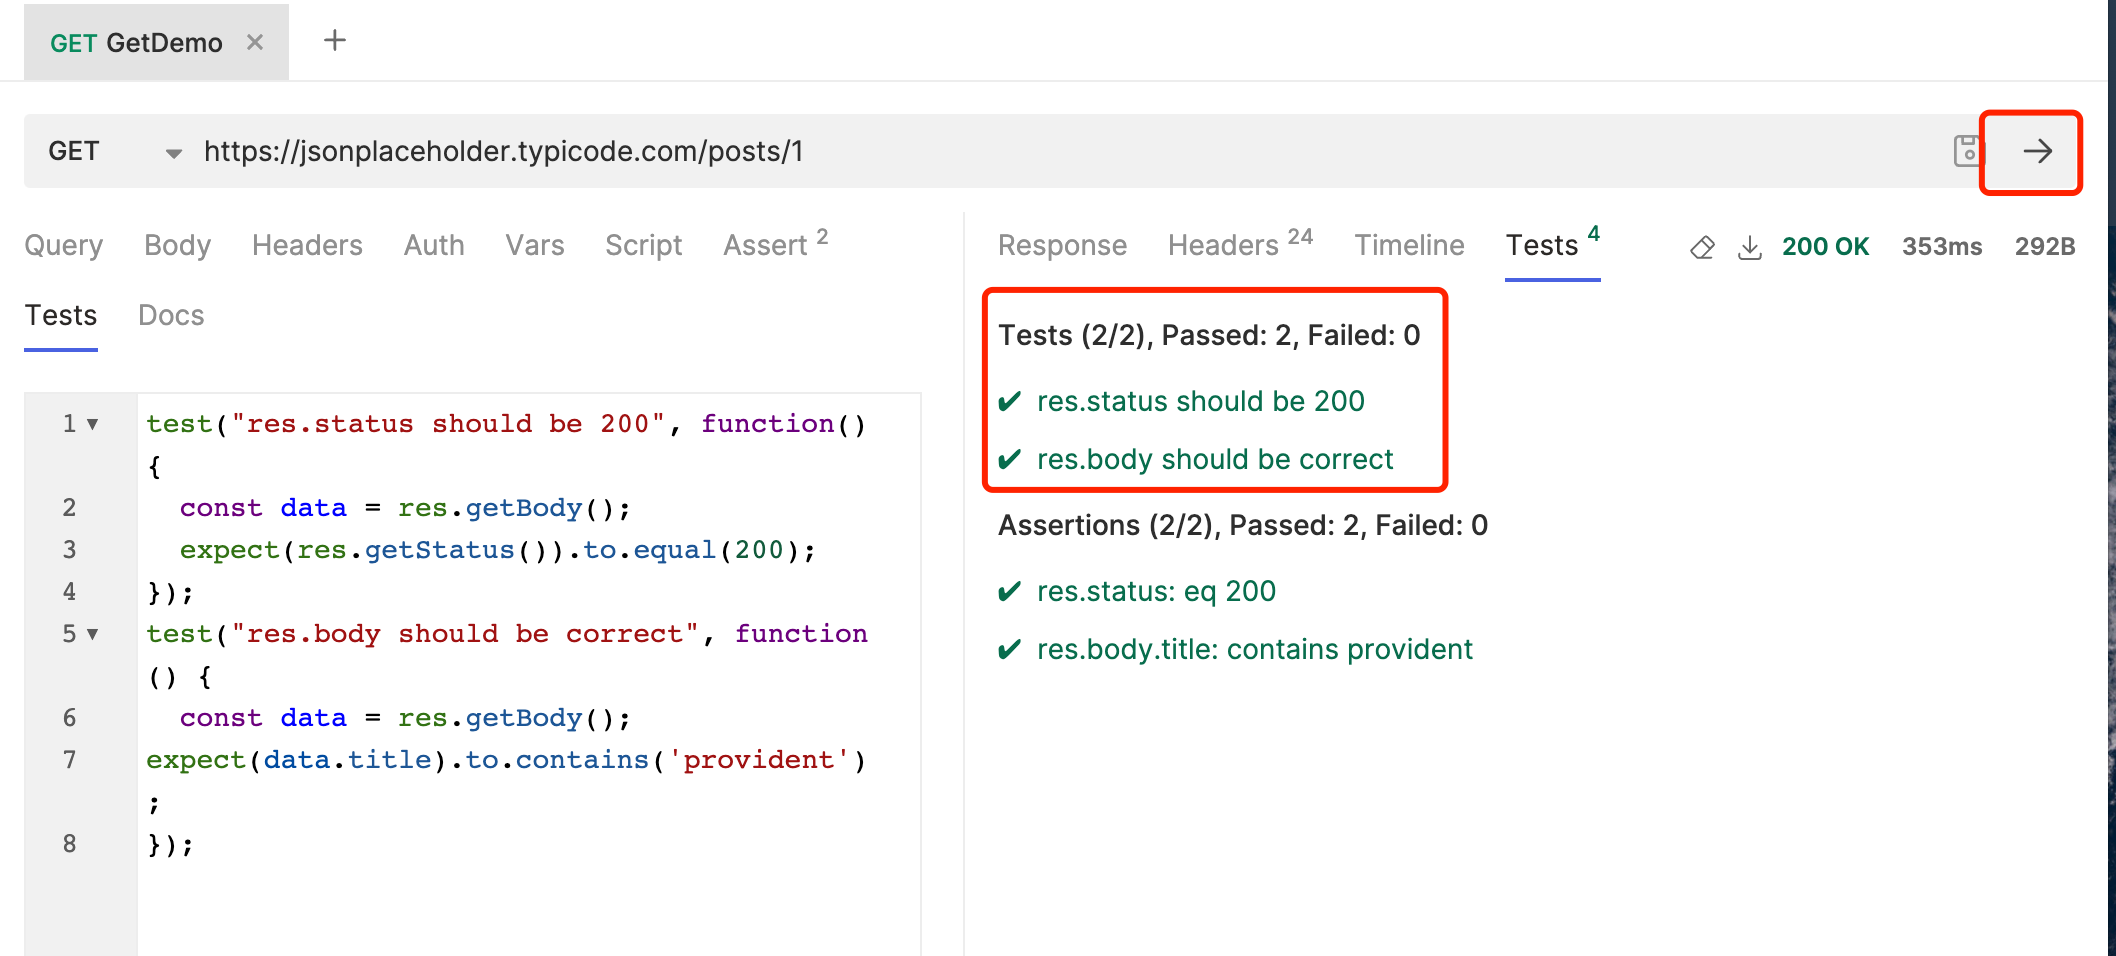
- Debugging Assertions: Click the Run button in the upper right corner to execute the assertions and check if the results meet expectations.
Creating a New POST Request Test Case
-
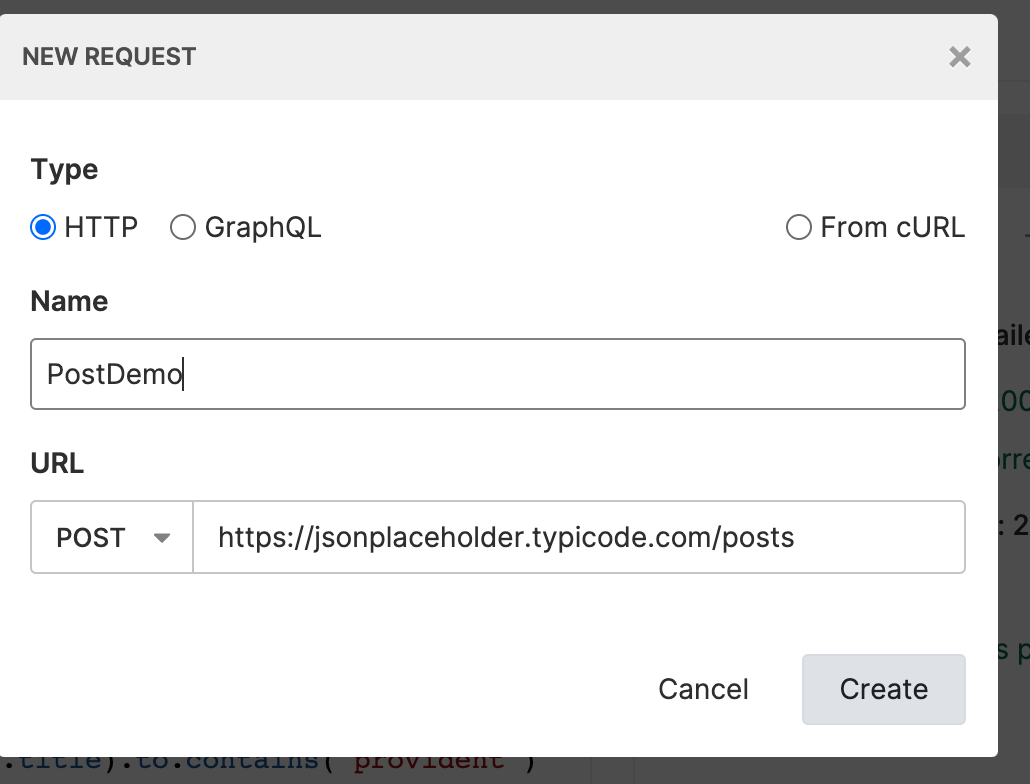
Click the ADD REQUEST button under the Testcase COLLECTION to create a new POST request.
-
Enter the request name as PostDemo, and the request URL as https://jsonplaceholder.typicode.com/posts.
-
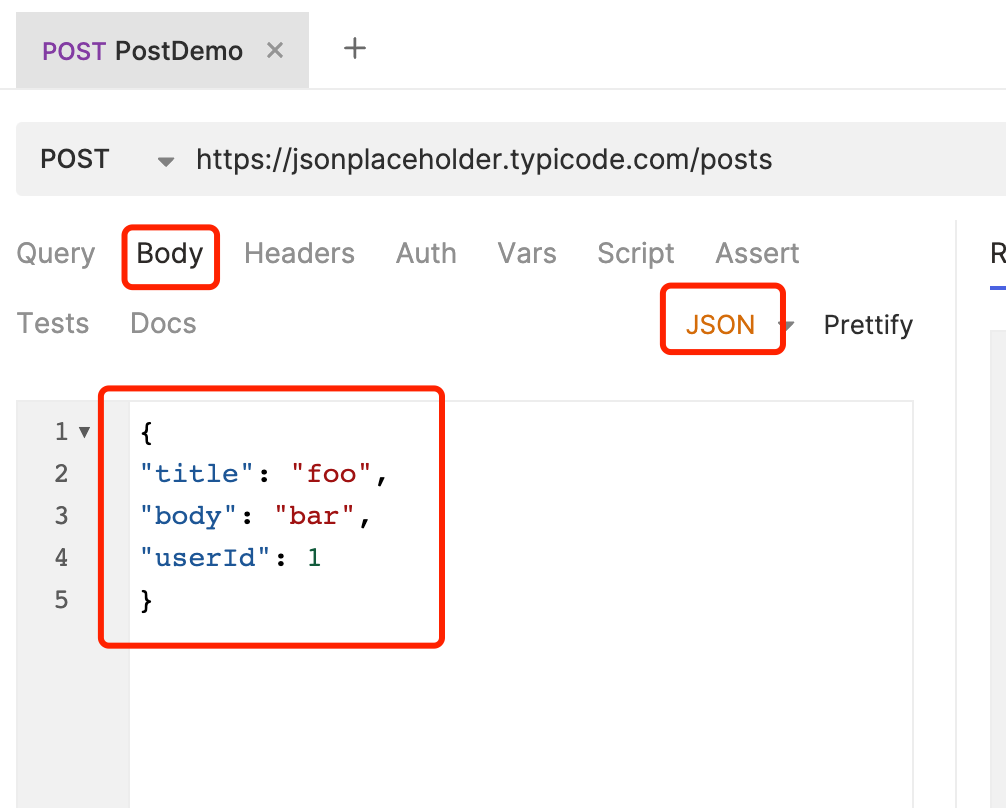
Click the Body button under the newly created PostDemo request to enter the request body editing page.
-
Select the body type as JSON and enter the request body content:
{
"title": "foo",
"body": "bar",
"userId": 1
}
Adding Test Assertions to the Post Request
Using Bruno’s Built-in Assert for Post Request Test Assertions
-
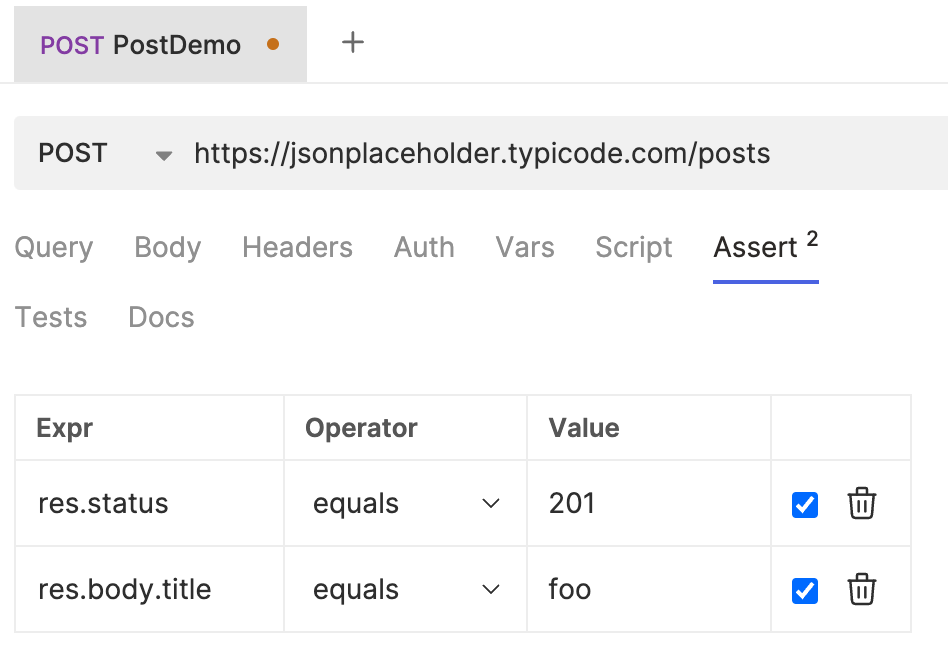
Click the Assert button under the PostDemo request to enter the test assertion editing page.
-
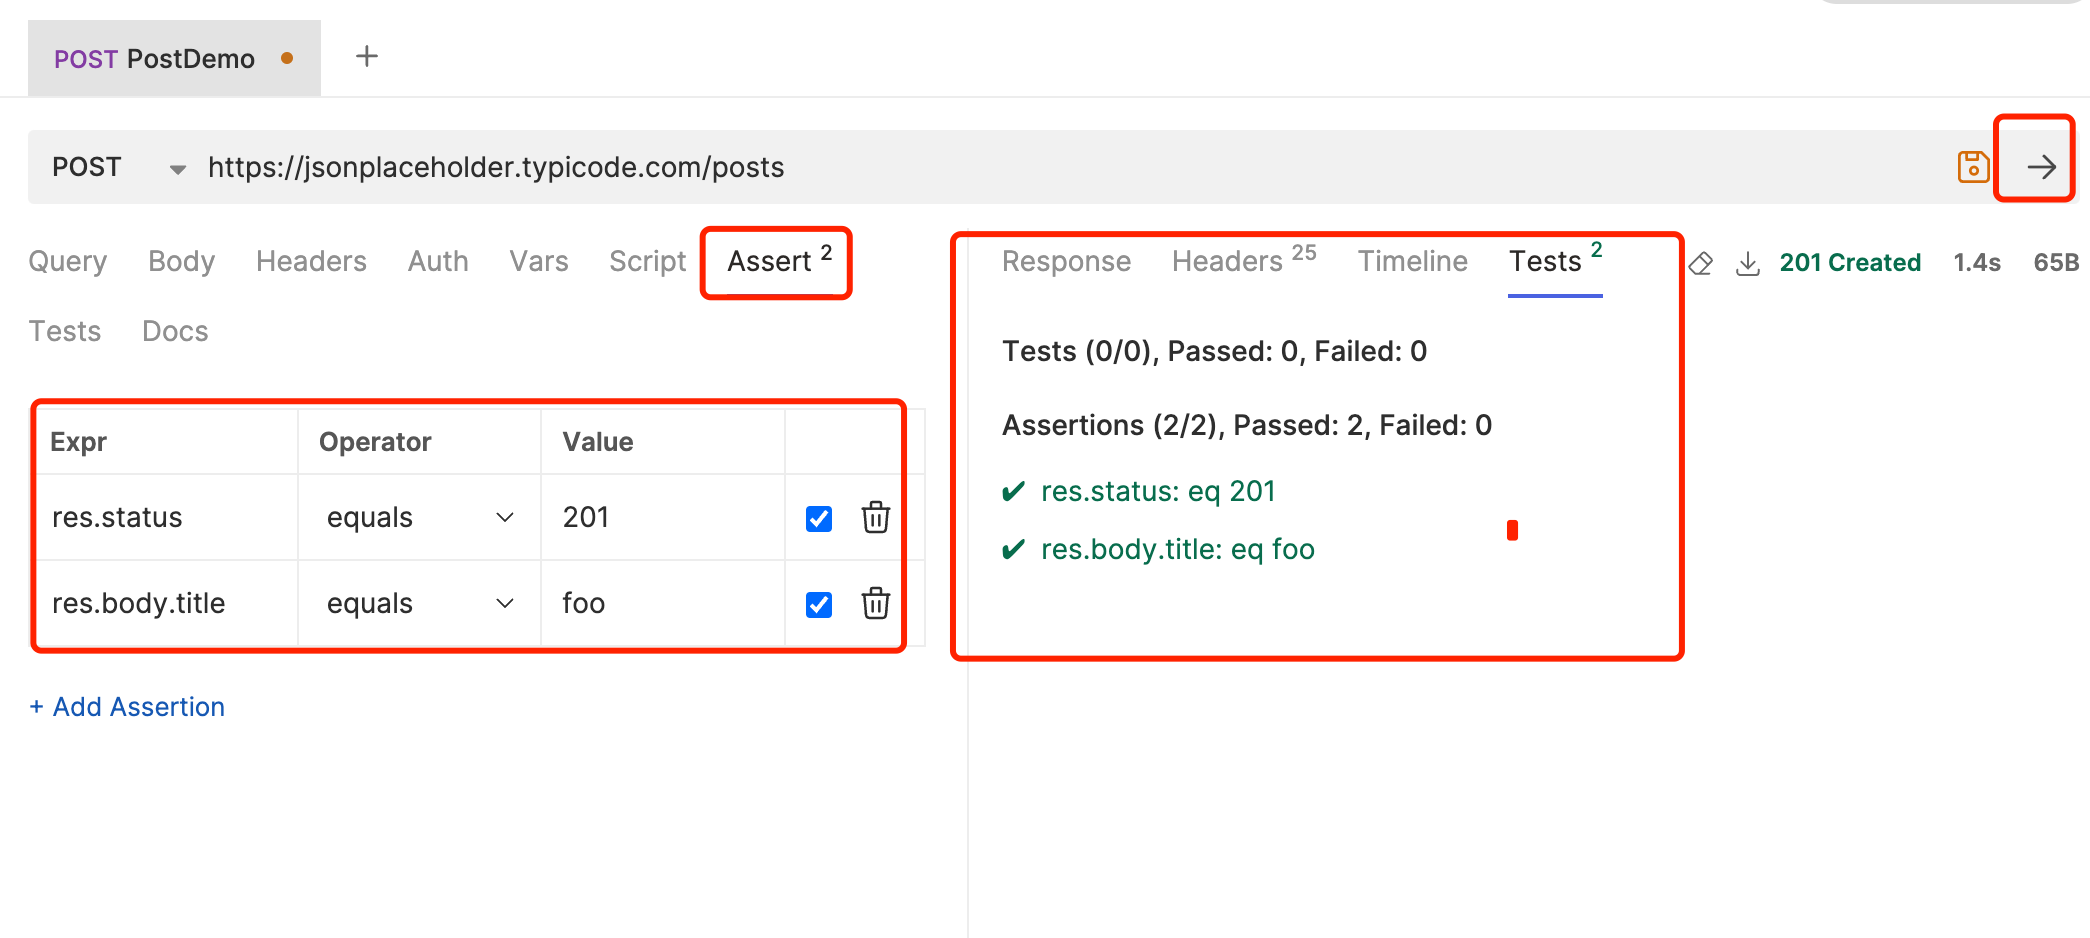
Enter Assertion 1: Response status code equals 201. Assertion 2: The title in the response body equals “foo.”
-
Debugging Assertions: Click the Run button in the upper right corner to execute the assertions and check if the results meet expectations.
Writing Test Assertions Using JavaScript for the Post Request
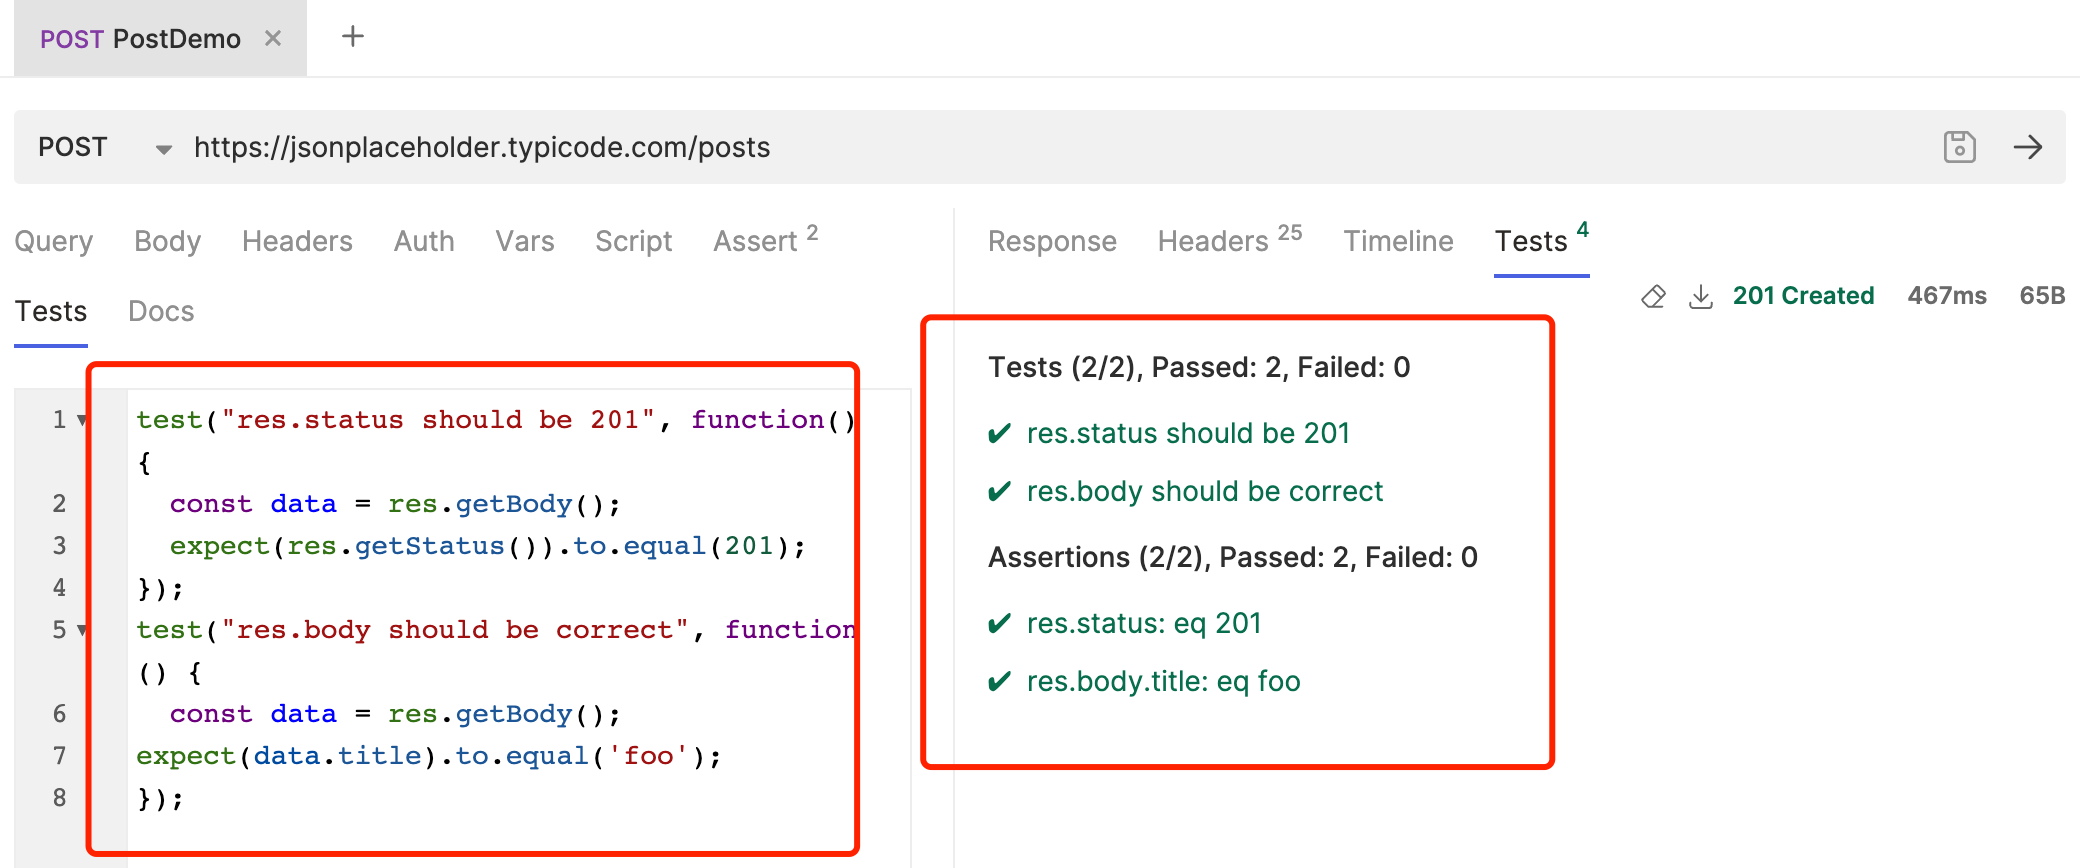
- Click the Tests button under the PostDemo request to enter the test script editing page.
- Enter the script code, Assertion 1: Response status code equals 201. Assertion 2: The title in the response body equals “foo.”
test("res.status should be 200", function() {
  const data = res.getBody();
  expect(res.getStatus()).to.equal(201);
});
test("res.body should be correct", function() {
  const data = res.getBody();
  expect(data.title).to.equal('foo');
});- Debugging Assertions: Click the Run button in the upper right corner to execute the assertions and check if the results meet expectations.
Running Two Test Cases Locally
- Click the Run button under the Testcase COLLECTION to run all test cases.
- Confirm if the results meet expectations.
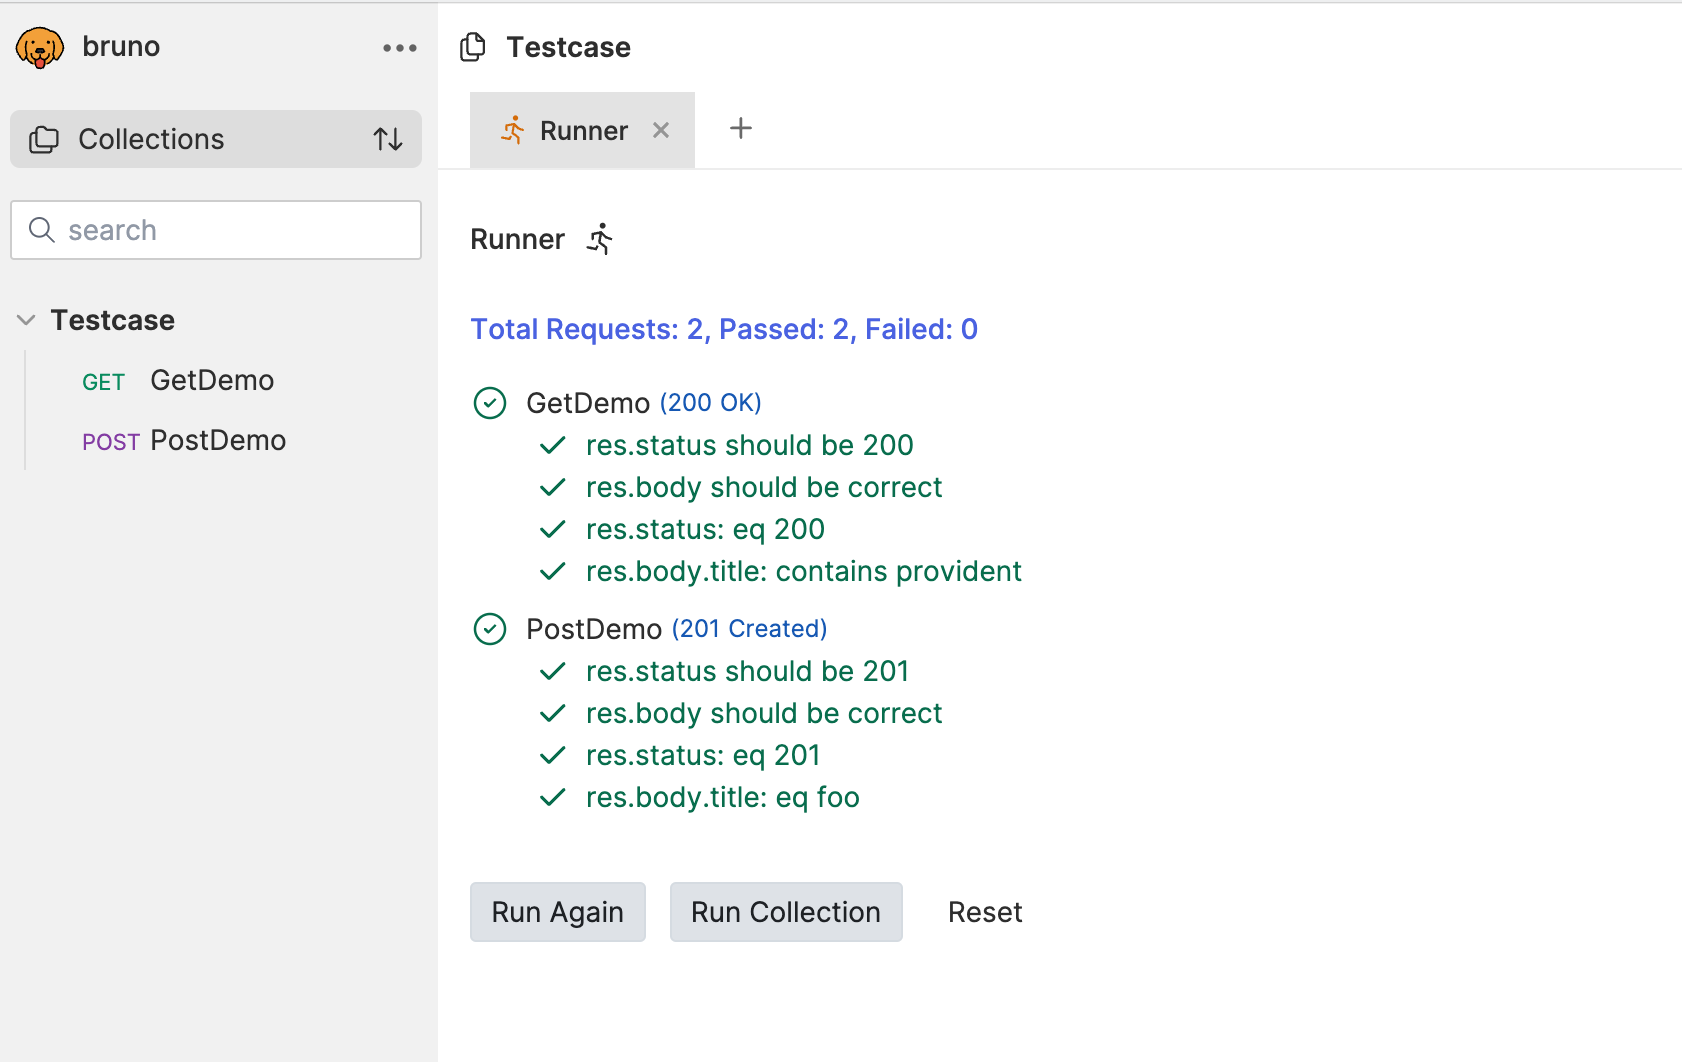
This concludes the writing and assertion of test cases for two interfaces.
Environment Variable Configuration
By reviewing the results of the two test cases, we found that the request addresses for both test cases are https://jsonplaceholder.typicode.com. If we need to run these two test cases in different testing environments, we need to modify the request addresses for both test cases. This could be tedious if there are many test cases. Bruno provides the functionality of environment variables, allowing us to configure request addresses in test cases as environment variables. This way, we only need to configure different environment variables in different testing environments to run test cases.
Creating Environment Variable Configuration Files
- Click the Environments button under the Testcase COLLECTION to enter the environment variable configuration page.
- Click the ADD ENVIRONMENT button in the upper right corner to create a new environment variable configuration file. Enter the name as dev and click the SAVE button to save the configuration file.
- Click the newly created dev environment variable configuration file to enter the environment variable configuration page.
- Click the ADD VARIABLE button in the upper right corner to create a new environment variable. Enter the name as host and the value as
https://jsonplaceholder.typicode.com. Click the SAVE button to save the environment variable.
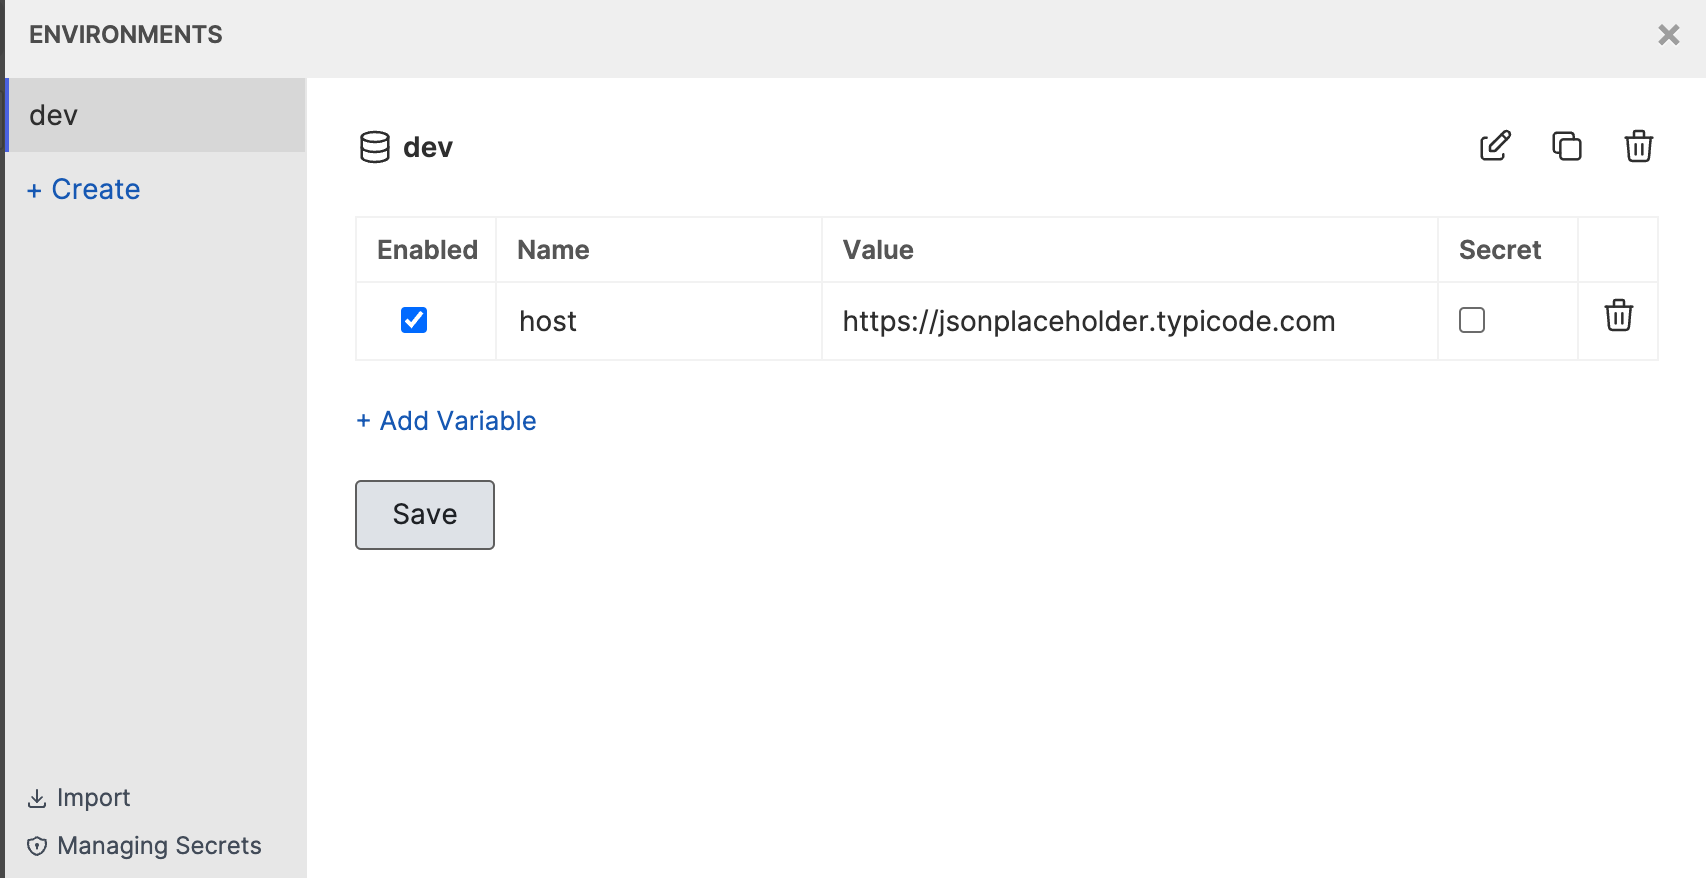
Using Environment Variables in Test Cases
- Click the GetDemo request under the Testcase COLLECTION to enter the GetDemo request editing page.
- Modify the request address of the GetDemo request to
{{host}}/posts/1and click the SAVE button to save the GetDemo request. - Click the PostDemo request under the Testcase COLLECTION to enter the PostDemo request editing page.
- Modify the request address of the PostDemo request to
{{host}}/postsand click the SAVE button to save the PostDemo request.
Debugging Environment Variables
- Click the Environments button under the Testcase COLLECTION, select the dev environment variable.
- Click the RUN button in the upper right corner to run all test cases. Confirm if the results meet expectations.
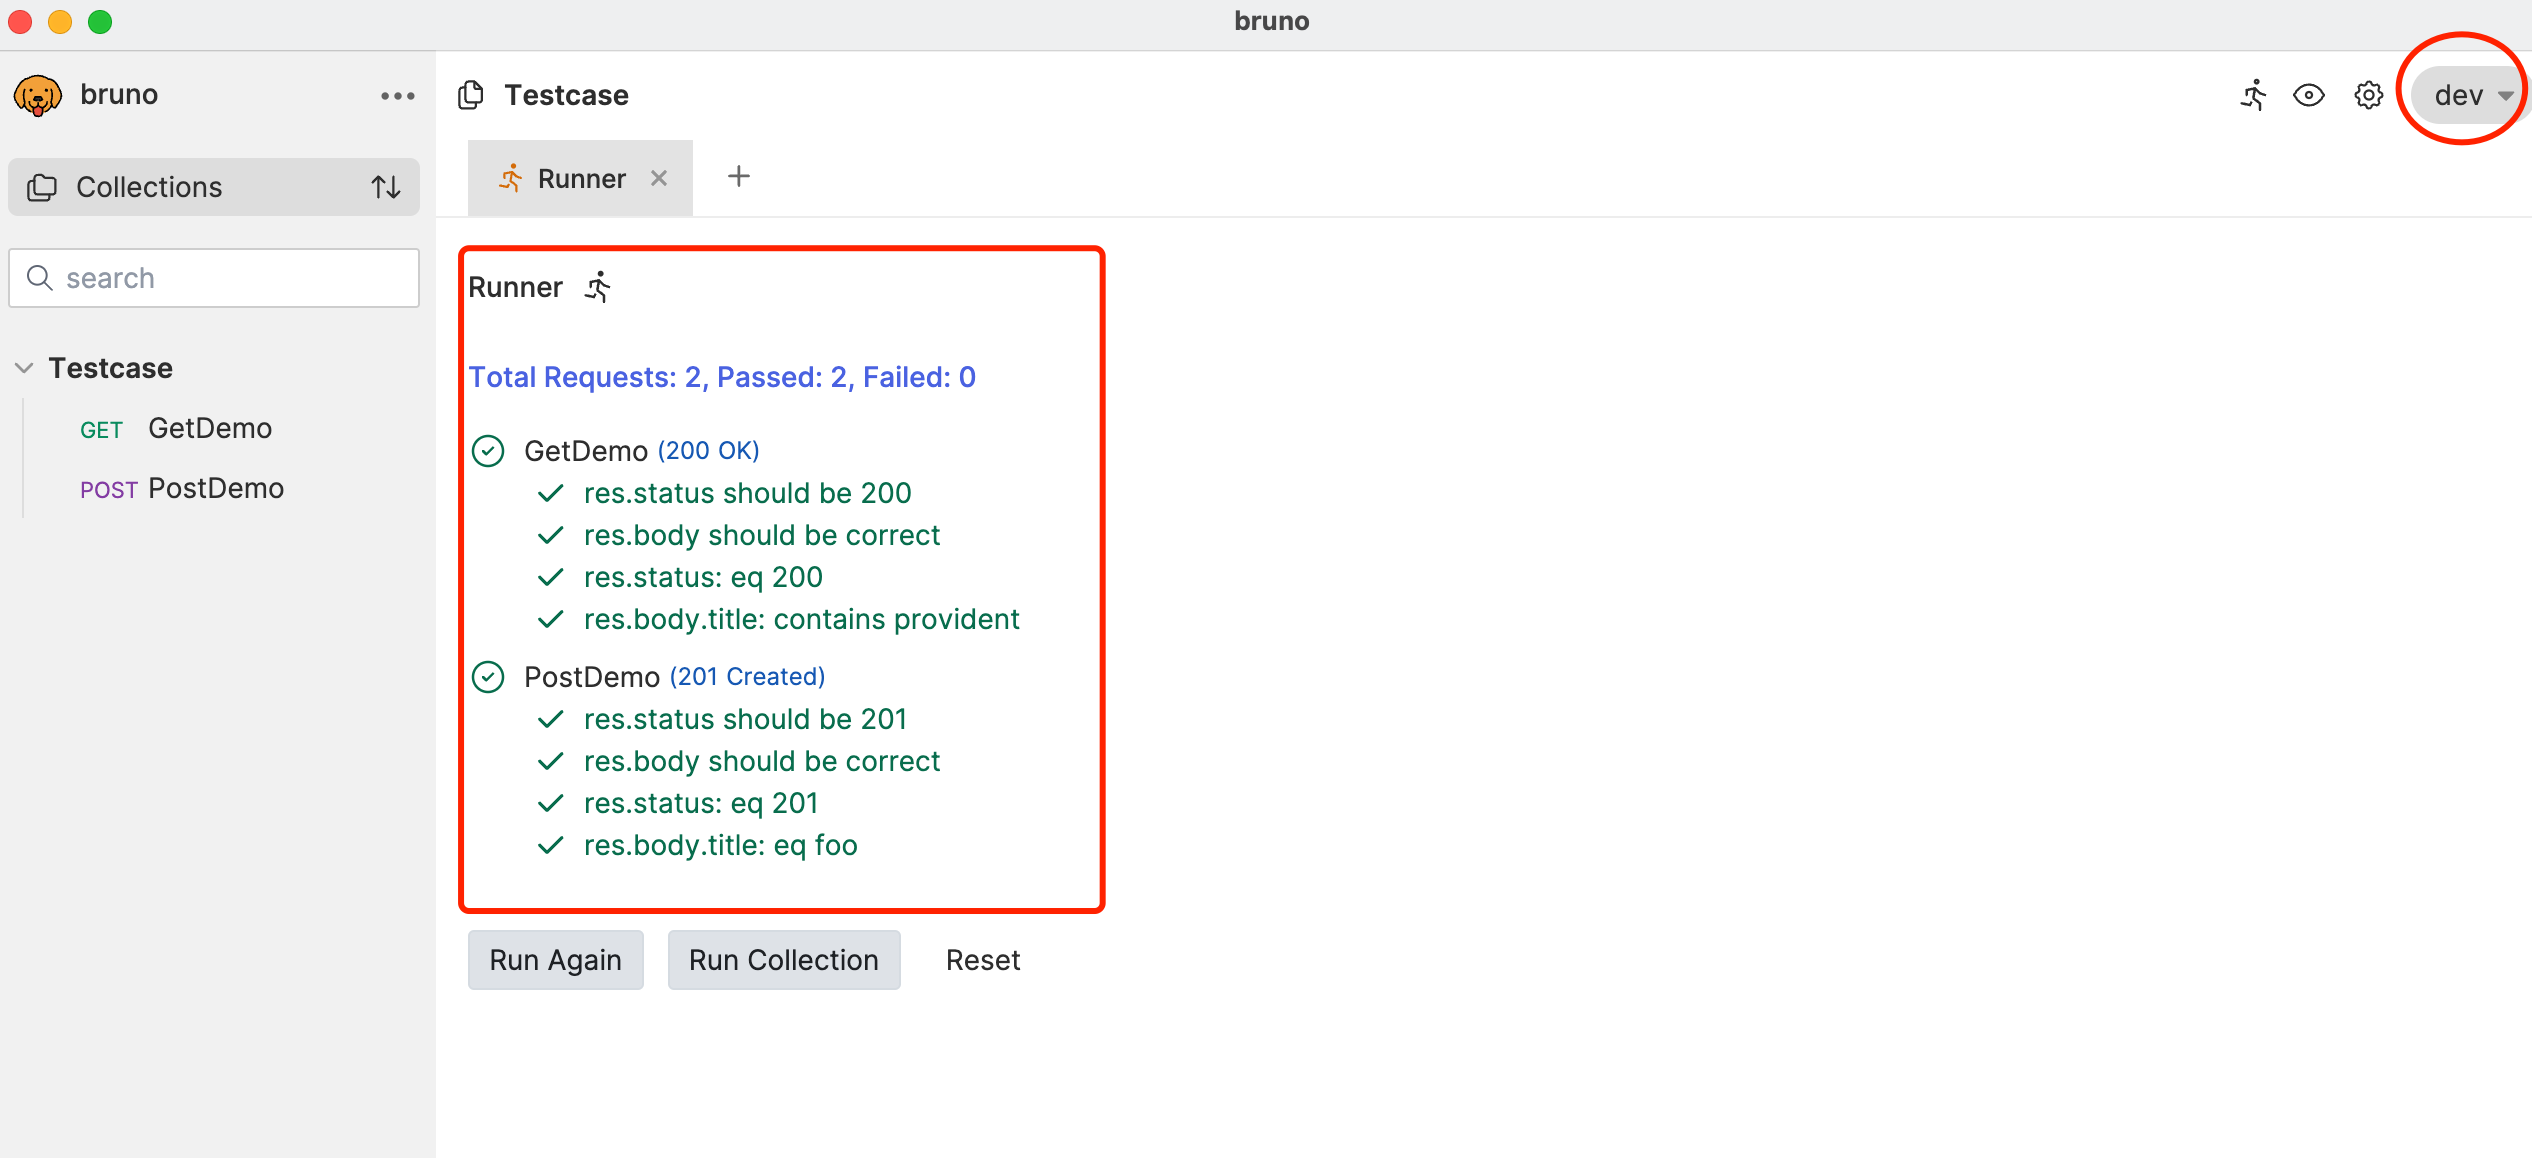
This concludes the configuration and debugging of environment variables.
Running Test Cases from the Command Line
Pre-check
We have set the storage directory for the test cases to the project folder created earlier. We need to check if the test case files and environment variable configuration files have been successfully created in the project folder.
Currently, our project folder directory structure is as follows:
Bruno-demo
├── package.json
├── package-lock.json
├── Testcase // Test case folder
│   └── APITestDemo1.bru // Test case file 1
│   └── APITestDemo2.bru // Test case file 2
│   └── bruno.json // Bruno COLLECTION configuration file
│   └── environments // Different test environment folder
│       └── dev.bru // Test environment configuration file
└── node_modules // Project dependencies
Debugging and Running Test Cases from the Command Line
- In the Testcase folder under the project file, run the command
bru run --env devto run all test cases. - Confirm if the results meet expectations.
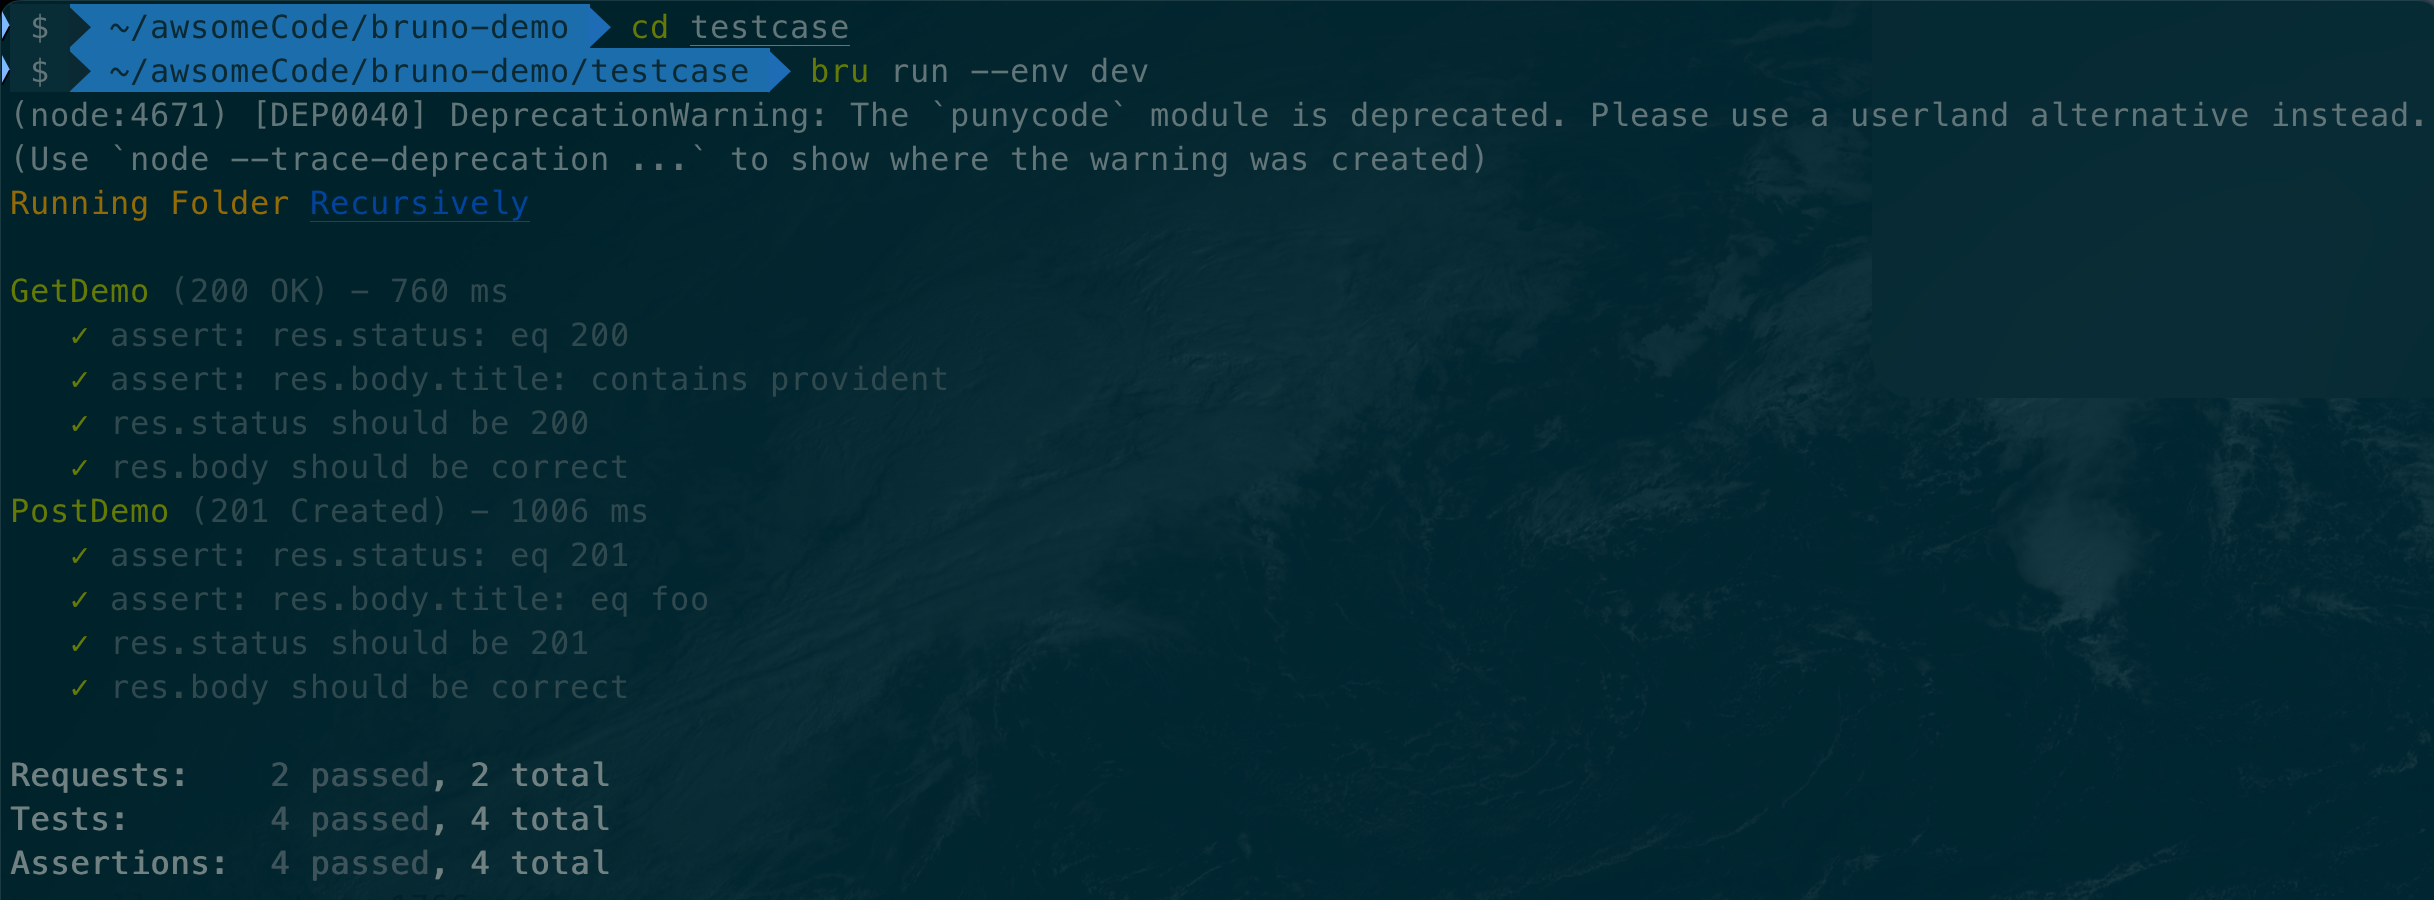
Generating JSON Format Reports
- In the Testcase folder under the project file, create a Report folder to store the test report files.
- In the Testcase folder, run the command
bru run --env dev --output Report/results.jsonto run all test cases.
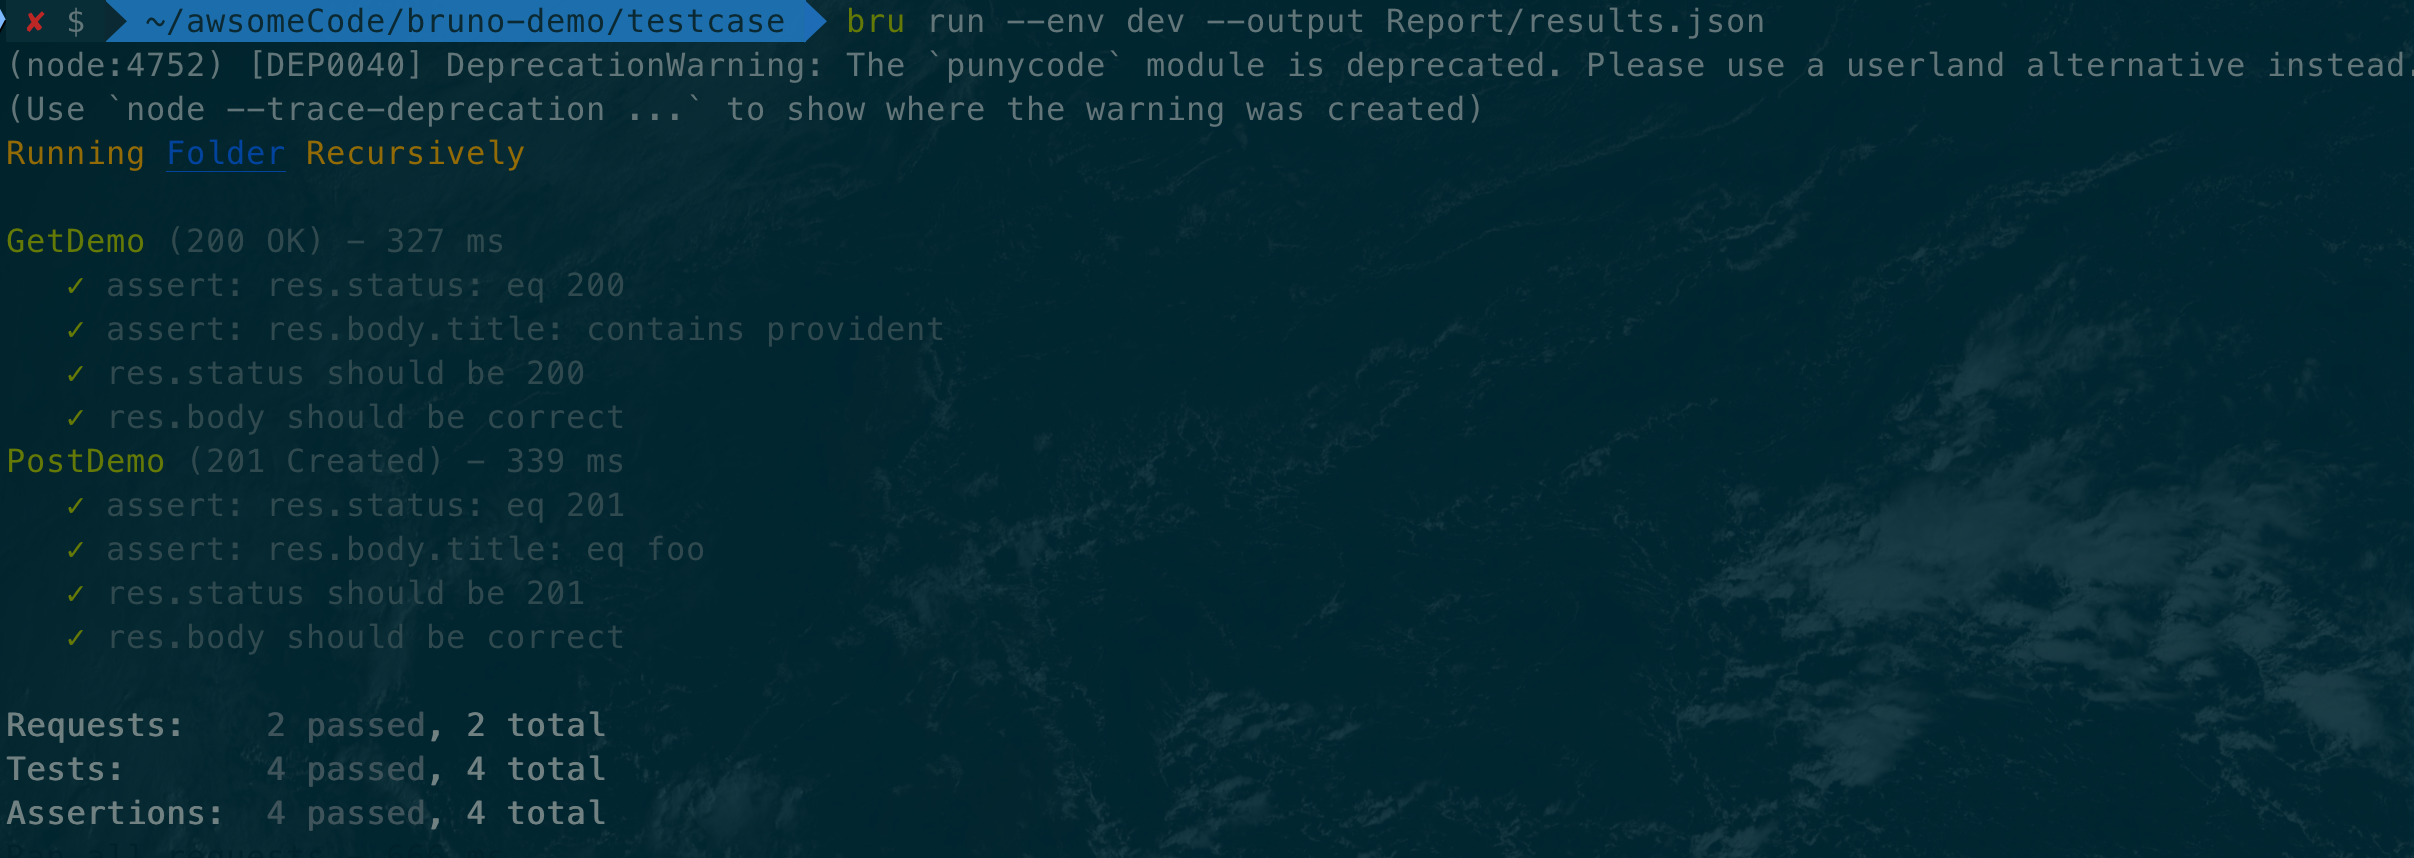
- Confirm that the test report file is generated successfully.
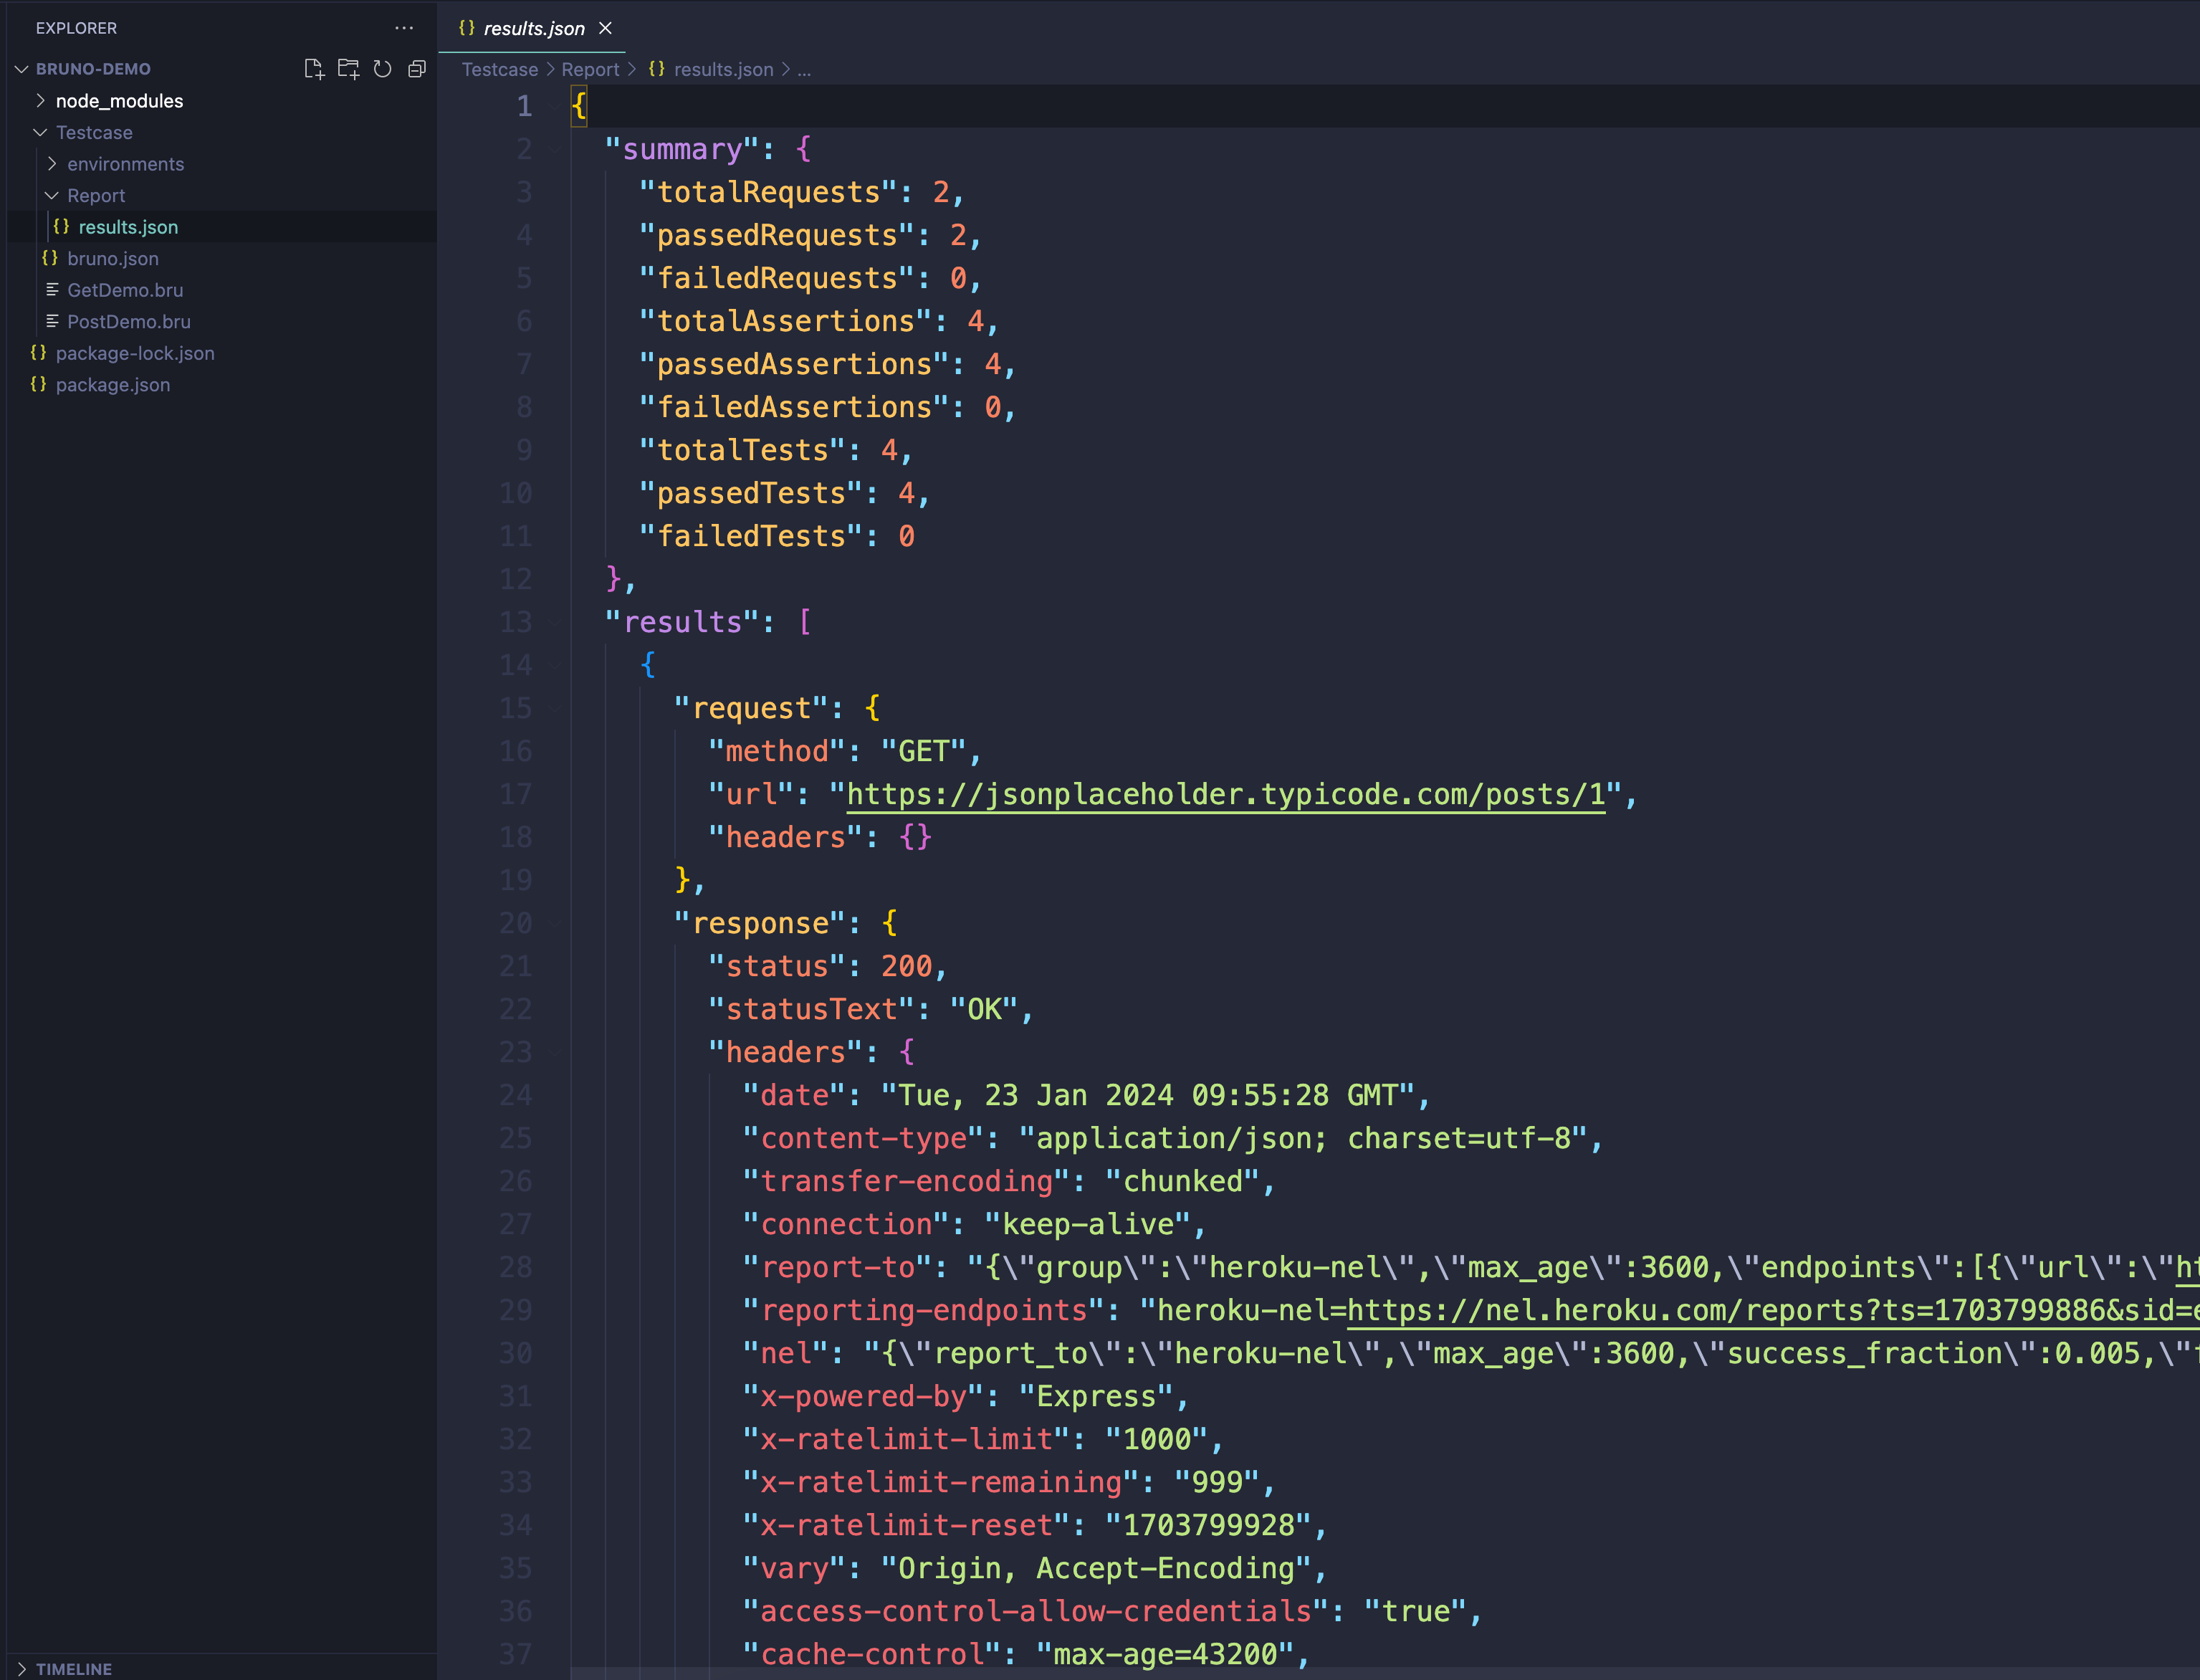
At this point, the construction of the Bruno API automation testing project is complete.
Integration into CI/CD Processes
For Bruno installation and basic usage, please refer to: Introduction to using Bruno as a postman replacement#CI/CD Integration
References
- Bruno Official Documentation https://docs.usebruno.com/
- Introduction to using Bruno as a postman replacement https://naodeng.com.cn/en/posts/api-automation-testing/introduction_of_bruno/