K6 Common Functions
The previous blog post introduced K6 Performance Testing Tutorial: Common Functions (1) - HTTP Requests, Metrics and Checks. This article focuses on threshold settings, test lifecycle, and scenario design, explaining how to use K6 to set reasonable thresholds in performance testing to effectively monitor system performance, and discussing the importance of test lifecycle and how to conduct targeted performance testing at different stages.
Thresholds
What are Thresholds
Thresholds are generally pass/fail criteria we define for test metrics. For K6, if the system under test’s performance doesn’t meet the threshold conditions, the test will end with a failed status.
The previously mentioned checks are used to verify whether test results meet expectations. If checks fail, the test continues, whereas thresholds are used to verify whether test results meet performance requirements. If not met, the test will end with a failed status.
Typically, when conducting performance testing, we use thresholds to write SLOs (Service Level Objectives) for different services or interfaces.
Here are some examples of thresholds:
- Less than 1% of requests return errors
- 95% of requests have response times below 200 milliseconds
- 99% of requests have response times below 400 milliseconds
- Specific endpoints always respond within 300 milliseconds
- Custom metrics (latency trends) meet any condition (greater than 300 milliseconds)
If you plan to write performance automation test scripts later, thresholds are essential.
- Set thresholds for your tests
- Automate execution
- Set up test failure alerts
Threshold Examples for HTTP Errors and Response Duration
The following example demonstrates how to use thresholds to set and evaluate HTTP error rates (http_req_failed metric) and evaluate whether 95% of request responses occur within a specific duration (http_req_duration metric):
import http from 'k6/http';

export const options = {
  thresholds: {
    http_req_failed: ['rate<0.01'], // HTTP error rate should be below 1%
    http_req_duration: ['p(95)<200'], // 95% of request responses should be below 200ms
  },
};

export default function () {
  http.get('https://test-api.k6.io/public/crocodiles/1/');
}
In the above example, we set two thresholds:
- HTTP error rate should be below 1% (using the http_req_failed metric)
- 95% of request responses should be below 200ms (using the http_req_duration metric)
For the thresholds set in the above code, if during execution the HTTP error rate is below 1% and 95% of request responses are below 200ms, the test will end with a success status; otherwise, if any threshold is not met, the test will end with a failed status.
Running this script, you can see the following results:
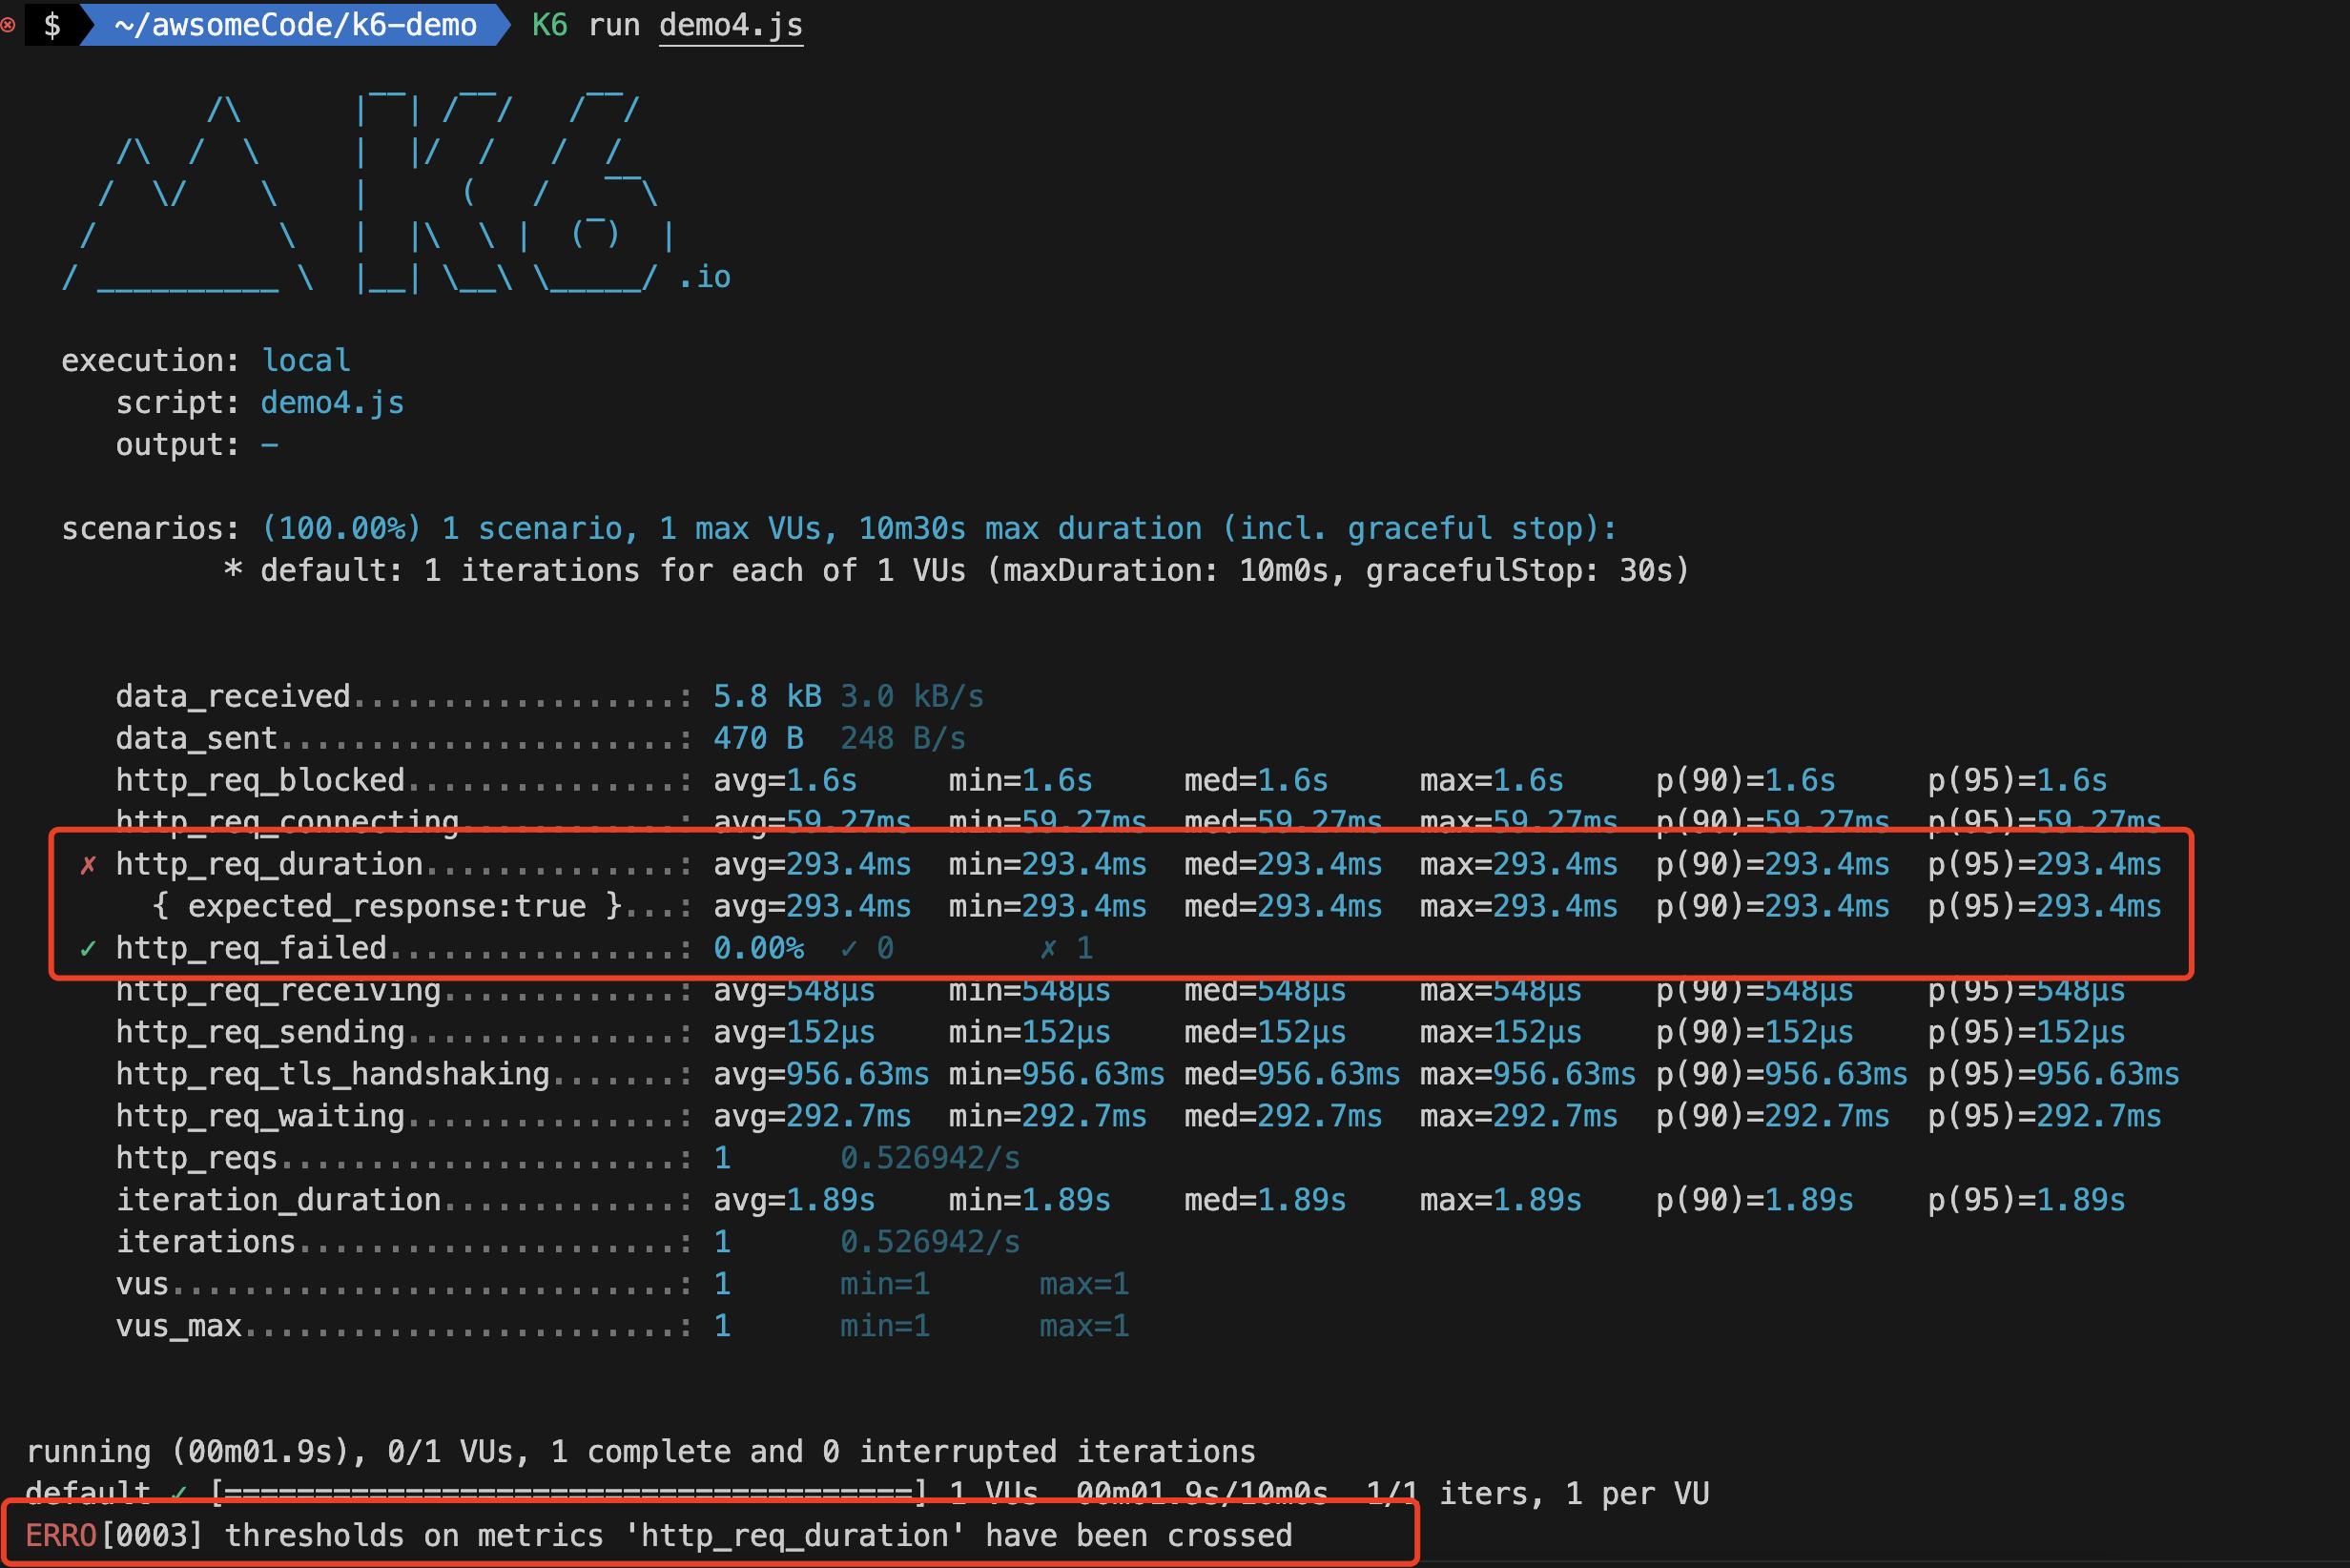
The results show that the http_req_failed threshold passed, but the http_req_duration threshold did not pass, and the overall test ended with a failed status.
If any threshold fails, the green checkmark ✓ next to the threshold name (http_req_failed, http_req_duration) will be ✗ and k6 will exit with a non-zero exit code.
Threshold Syntax
Threshold syntax is a string consisting of the following parts:
- Metric name (e.g., http_req_duration)
- One or more conditions, separated by commas
- Each condition consists of an operator and a value
- Operators can be one of: >, >=, <, <=, ==, !=, =
, ! - Values can be numbers or percentages
- Percentage values must be between 0 and 100
To use thresholds in test scripts, follow these steps:
- Add the thresholds property to the options object as follows:
export const options = {
  thresholds: {
    /* ... */
  },
};- Define threshold expressions (at least one, can be multiple) in the thresholds object as follows:
export const options = {
  thresholds: {
    // Short format
    METRIC_NAME1: ['THRESHOLD_EXPRESSION', `...`],
    // Long format
    METRIC_NAME2: [
      {
        threshold: 'THRESHOLD_EXPRESSION',
        abortOnFail: true, // boolean
        delayAbortEval: '10s', // string
      },
    ],
  },
};- Threshold expressions support both short and long formats. The short format puts all threshold expressions as strings in an array. The long format puts each threshold in an object with additional properties for aborting on failure.
- METRIC_NAME1 and THRESHOLD_EXPRESSION in the example code are placeholders. Normally, they must be metric names and threshold expressions.
- The example code declares two thresholds for metrics metric_name1 and metric_name2. Whether thresholds pass or fail is determined by evaluating the ‘threshold_expression’ after the threshold.
Threshold Expression Syntax
Threshold expressions evaluate to true or false. Threshold expressions must be in the following format:
<aggregation_method> <operator> <value><aggregation_method>: Aggregation method used to calculate metric values. For example, p(95) represents the 95th percentile, while avg represents the average.<operator>: Operator used to compare metric values with values in threshold expressions. For example, > means greater than, < means less than, == means equal to.<value>: Value in the threshold expression. For example, 200 means 200 milliseconds, 95 means 95%.
Some examples of threshold expressions:
- avg < 200 // Average duration must be less than 200 milliseconds
- count >= 500 // Count must be greater than or equal to 500
- p(90) < 300 // 90% of samples must be below 300
Aggregation Methods by Type
k6 aggregates metrics by type. These aggregation methods form part of threshold expressions.
Here’s a list of aggregation methods by type:
| Metric Type | Aggregation Methods |
|---|---|
| Counter | count and rate |
| Gauge | value |
| Rate | rate |
| Trend | avg (average), min (minimum), max (maximum), med (median) and p(N) where N specifies the threshold percentile value, expressed as a number between 0.0 and 100. p(99.99) represents the 99.99th percentile. These values are in milliseconds. |
A complex aggregation method example:
import http from 'k6/http';
import { Trend, Rate, Counter, Gauge } from 'k6/metrics';
import { sleep } from 'k6';

export const TrendRTT = new Trend('RTT');
export const RateContentOK = new Rate('Content OK');
export const GaugeContentSize = new Gauge('ContentSize');
export const CounterErrors = new Counter('Errors');
export const options = {
  thresholds: {
    // Count: No more than 99 error content returns allowed
    'Errors': ['count<100'],
    // Gauge: Returned content must be controlled below 4000 bytes
    'ContentSize': ['value<4000'],
    // Rate: Content must reach "OK" more than 95 times
    'Content OK': ['rate>0.95'],
    // Trend: Percentiles, average, median and minimum must stay within specified millisecond ranges
    'RTT': ['p(99)<300', 'p(70)<250', 'avg<200', 'med<150', 'min<100'],
  },
};

export default function () {
  const res = http.get('https://test-api.k6.io/public/crocodiles/1/');
  const contentOK = res.json('name') === 'Bert';

  TrendRTT.add(res.timings.duration);
  RateContentOK.add(contentOK);
  GaugeContentSize.add(res.body.length);
  CounterErrors.add(!contentOK);

  sleep(1);
}
Note: Don’t specify multiple thresholds for the same metric by repeating the same object key.
Since thresholds are defined as properties of JavaScript objects, you cannot specify multiple thresholds with the same property name. If you want to set multiple thresholds for one metric, specify them using an array of the same key.
Common Threshold Examples
The fastest way to use thresholds is to start with built-in metrics. Here are some commonly used copy-paste examples:
1. Percentage of Requests Completed Within Specified Duration
import http from 'k6/http';
import { sleep } from 'k6';

export const options = {
  thresholds: {
    // 90% of requests must complete within 400 milliseconds
    http_req_duration: ['p(90) < 400'],
  },
};

export default function () {
  http.get('https://test-api.k6.io/public/crocodiles/1/');
  sleep(1);
}
2. Error Rate Below 1%
import http from 'k6/http';
import { sleep } from 'k6';

export const options = {
  thresholds: {
    // Error rate must be below 1% throughout test execution
    http_req_failed: ['rate<0.01'],
  },
};

export default function () {
  http.get('https://test-api.k6.io/public/crocodiles/1/');
  sleep(1);
}
3. Multiple Thresholds for Single Metric
We can also apply multiple thresholds to a single metric. This threshold has different duration requirements for different request percentiles.
import http from 'k6/http';
import { sleep } from 'k6';

export const options = {
  thresholds: {
    // 90% of requests must complete within 400ms, 95% within 800ms, 99.9% within 2 seconds
    http_req_duration: ['p(90) < 400', 'p(95) < 800', 'p(99.9) < 2000'],
  },
};

export default function () {
  const res1 = http.get('https://test-api.k6.io/public/crocodiles/1/');
  sleep(1);
}
4. Thresholds for Duration Groups
We can also set thresholds for each group. This code has groups for individual requests and batch requests. Each group has different thresholds.
import http from 'k6/http';
import { group, sleep } from 'k6';

export const options = {
  thresholds: {
    'group_duration{group:::individualRequests}': ['avg < 400'],
    'group_duration{group:::batchRequests}': ['avg < 200'],
  },
  vus: 1,
  duration: '10s',
};

export default function () {
  group('individualRequests', function () {
    http.get('https://test-api.k6.io/public/crocodiles/1/');
    http.get('https://test-api.k6.io/public/crocodiles/2/');
    http.get('https://test-api.k6.io/public/crocodiles/3/');
  });

  group('batchRequests', function () {
    http.batch([
      ['GET', `https://test-api.k6.io/public/crocodiles/1/`],
      ['GET', `https://test-api.k6.io/public/crocodiles/2/`],
      ['GET', `https://test-api.k6.io/public/crocodiles/3/`],
    ]);
  });

  sleep(1);
}
Aborting Test When Threshold is Exceeded
If during testing we want to abort the test when a threshold is not met, we can use the abortOnFail property.
Set the abortOnFail property to true. When you set abortOnFail, the test run stops as soon as the threshold fails.
There’s also a special case where the test might abort before generating important data due to this threshold setting. To prevent these situations, we can use delayAbortEval to delay abortOnFail. In this script, abortOnFail is delayed by ten seconds. After ten seconds, if the p(99) < 10 threshold is not met, the test will abort.
export const options = {
  thresholds: {
    metric_name: [
      {
        threshold: 'p(99) < 10', // string
        abortOnFail: true, // boolean
        delayAbortEval: '10s', // string
        /*...*/
      },
    ],
  },
};
For more information about thresholds, please refer to the official documentation: https://k6.io/docs/using-k6/thresholds/
Test Lifecycle
The lifecycle of tests in the K6 framework always executes in the same order:
initInitialization phase: Code in context prepares scripts, loads files, imports modules, and defines testlifecycle functions. Required.setupSetup phase: Sets up test environment and generates data. Optional.VUVU phase: Code runs in default or scenario functions, running for as long and as many times as defined by options. Required.teardownTeardown phase: Post-processes data and closes test environment. Optional.
Lifecycle functions: Except for initialization code, each phase occurs in lifecycle functions, which are functions called by the k6 runtime in a specific order.
Here’s a complete test lifecycle example:
// 1. Configure init phase (required)

export function setup() {
  // 2. Configure setup phase (optional)
}

export default function (data) {
  // 3. Configure VU phase (required)
}

export function teardown(data) {
  // 4. Configure teardown phase (optional)
}
Lifecycle Phase Overview
| Test Phase | Purpose | Example | Number of Requests |
|---|---|---|---|
| init Initialization phase | Load local files, import modules, declare lifecycle functions | Open JSON file, import modules | Once per VU* |
| Setup Setup phase | Set up data to process, share data between VUs | Call API to start test environment | Once |
| VU code VU code phase | Run test function, typically default | Make https requests, validate responses | Once per iteration, multiple times as needed by test options |
| Teardown Teardown phase | Process setup results, stop test environment | Verify setup has certain results, send webhook notification that test is complete | Once** |
*In cloud scripts, init code may be called more frequently.**If the Setup function ends abnormally (e.g., throws an error), the teardown() function will not be called. Consider adding logic to the setup() function to handle errors and ensure proper cleanup.
init Initialization Phase
The necessary phase of K6 testing. This phase is used to prepare the test environment and initialize test conditions before testing.
Code in the init context runs once per VU.
Things that might be done in the init phase:
- Import modules
- Load files from local file system
- Configure all options for testing
- Define lifecycle functions for VU, setup and teardown phases (and custom or handleSummary() functions)
Code in the init context always executes first
VU Phase
The VU phase is the core of testing. In this phase, code runs in default or scenario functions, running for as long and as many times as defined by options.
Q&A about the VU phase:
-
- Why have a VU phase?
- The VU phase is the core of testing, and scripts must contain at least one scenario function that defines VU logic. Code inside this function is VU code.
- The VU phase is the actual test code, so VU phase code is executed multiple times, as many times as defined by options.
-
- Why separate init phase and VU phase?
- Separating the init phase from the VU phase eliminates irrelevant calculations in VU code, improving k6 performance and making test results more reliable. One limitation of init code is that it cannot make HTTP requests. This limitation ensures that the init phase is reproducible in tests (protocol request responses are dynamic and unpredictable).
- Separating the init phase from the VU phase makes VU phase code more concise and focused on test logic.
-
- Understanding the default function lifecycle of the VU phase
- VUs execute the default() function sequentially from start to finish. Once a VU reaches the end of the function, it loops back to the beginning and re-executes the code.
- As part of this “restart” process, k6 resets the VU. Cookies are cleared, TCP connections may be disconnected (depending on our test configuration options).
Setup and Teardown Phases
Setup and teardown phases are optional. Both phases run before and after the VU phase.
Like default, setup and teardown functions must be exported functions. But unlike the default function, k6 calls setup and teardown only once per test.
- setup is called at the start of the test, after the init phase but before the VU phase.
- teardown is called at the end of the test, after the VU phase (default function).
- Unlike the init phase, you can call the full k6 API in setup and teardown phases.
For more information about K6 test lifecycle, please refer to the official documentation: https://k6.io/docs/using-k6/test-life-cycle/
Scenarios
In K6 test scripts, you can define multiple test scenarios, each with its own configuration items, such as VU count, duration, etc.
Test scenarios can configure VU and iteration plans in detail. Through test scenario configuration, we can better customize different workloads or traffic patterns in performance testing according to business needs.
Benefits of using test scenario configuration:
- Simpler, more flexible test organization. You can define multiple test scenarios in the same script, each executing different JavaScript functions independently.
- Simulate more realistic traffic situations. Each test scenario can use different virtual user (VU) and iteration scheduling patterns, supported by specially designed executors.
- Parallel or sequential workloads. Individual scenarios run independently in parallel, although they can appear to run sequentially by carefully setting each scenario’s startTime property.
- Nuanced results analysis. Different environment variables and metric tags can be set for each scenario.
Test Scenario Configuration
We can configure specific scenario plans using the scenarios key in the options object in code. You can also specify any name for scenarios, as long as each scenario name in the script is unique.
Scenario configuration example:
export const options = {
  scenarios: {
    example_scenario: {
      // Executor name to use
      executor: 'shared-iterations',

      // Common scenario configuration
      startTime: '10s',
      gracefulStop: '5s',
      env: { EXAMPLEVAR: 'testing' },
      tags: { example_tag: 'testing' },

      // Executor-related special configuration
      vus: 10,
      iterations: 200,
      maxDuration: '10s',
    },
    another_scenario: {
      /*...*/
    },
  },
};
Test Scenario Executors
For each k6 scenario, VU (virtual user) workload is scheduled by executors. Executors configure test run duration, whether traffic remains constant or changes, and whether workload is modeled by VUs or arrival rate (i.e., open or closed model).
The test scenario object we set must define the executor property and choose one of the predefined executor names. The executor you choose determines how k6 models the load. Options include:
-
By iteration count:
- shared-iterations shares iterations among VUs
- per-vu-iterations lets each VU run configured iterations
-
By VU count:
- constant-VUs sends VUs in constant numbers
- ramping-vus increases VU count according to stages you configure
-
By iteration rate:
- constant-arrival-rate starts iterations at a constant rate
- ramping-arrival-rate increases iteration rate according to stages you configure
Besides these common scenario options, each executor object has additional options specific to its workload. Click Executors for more information.
Test Scenario Configuration Options
| Option Name | Type | Description | Default |
|---|---|---|---|
| executor (required) | string | Unique executor name | - |
| startTime | string | Time offset from test start when this scenario should begin execution | ”0s” |
| gracefulStop | string | Time to wait for iterations to complete execution before forcibly stopping | ”30s” |
| exec | string | Name of exported JS function to execute | ”default” |
| env | object | Environment variables specific to this scenario | {} |
| tags | object | Tags specific to this scenario | {} |
Test Scenario Example
The test scenario demo script combines two scenarios and executes them sequentially:
- shared_iter_scenario starts immediately. 10 VUs attempt to use 100 iterations as quickly as possible (some VUs may use more iterations than others).
- per_vu_scenario starts after 10 seconds. In this case, ten VUs each run ten iterations.
Example code:
import http from 'k6/http';

export const options = {
  scenarios: {
    shared_iter_scenario: {
      executor: 'shared-iterations',
      vus: 10,
      iterations: 100,
      startTime: '0s',
    },
    per_vu_scenario: {
      executor: 'per-vu-iterations',
      vus: 10,
      iterations: 10,
      startTime: '10s',
    },
  },
};

export default function () {
  http.get('https://test.k6.io/');
}
Running the scenario demo script, you can see the following results:
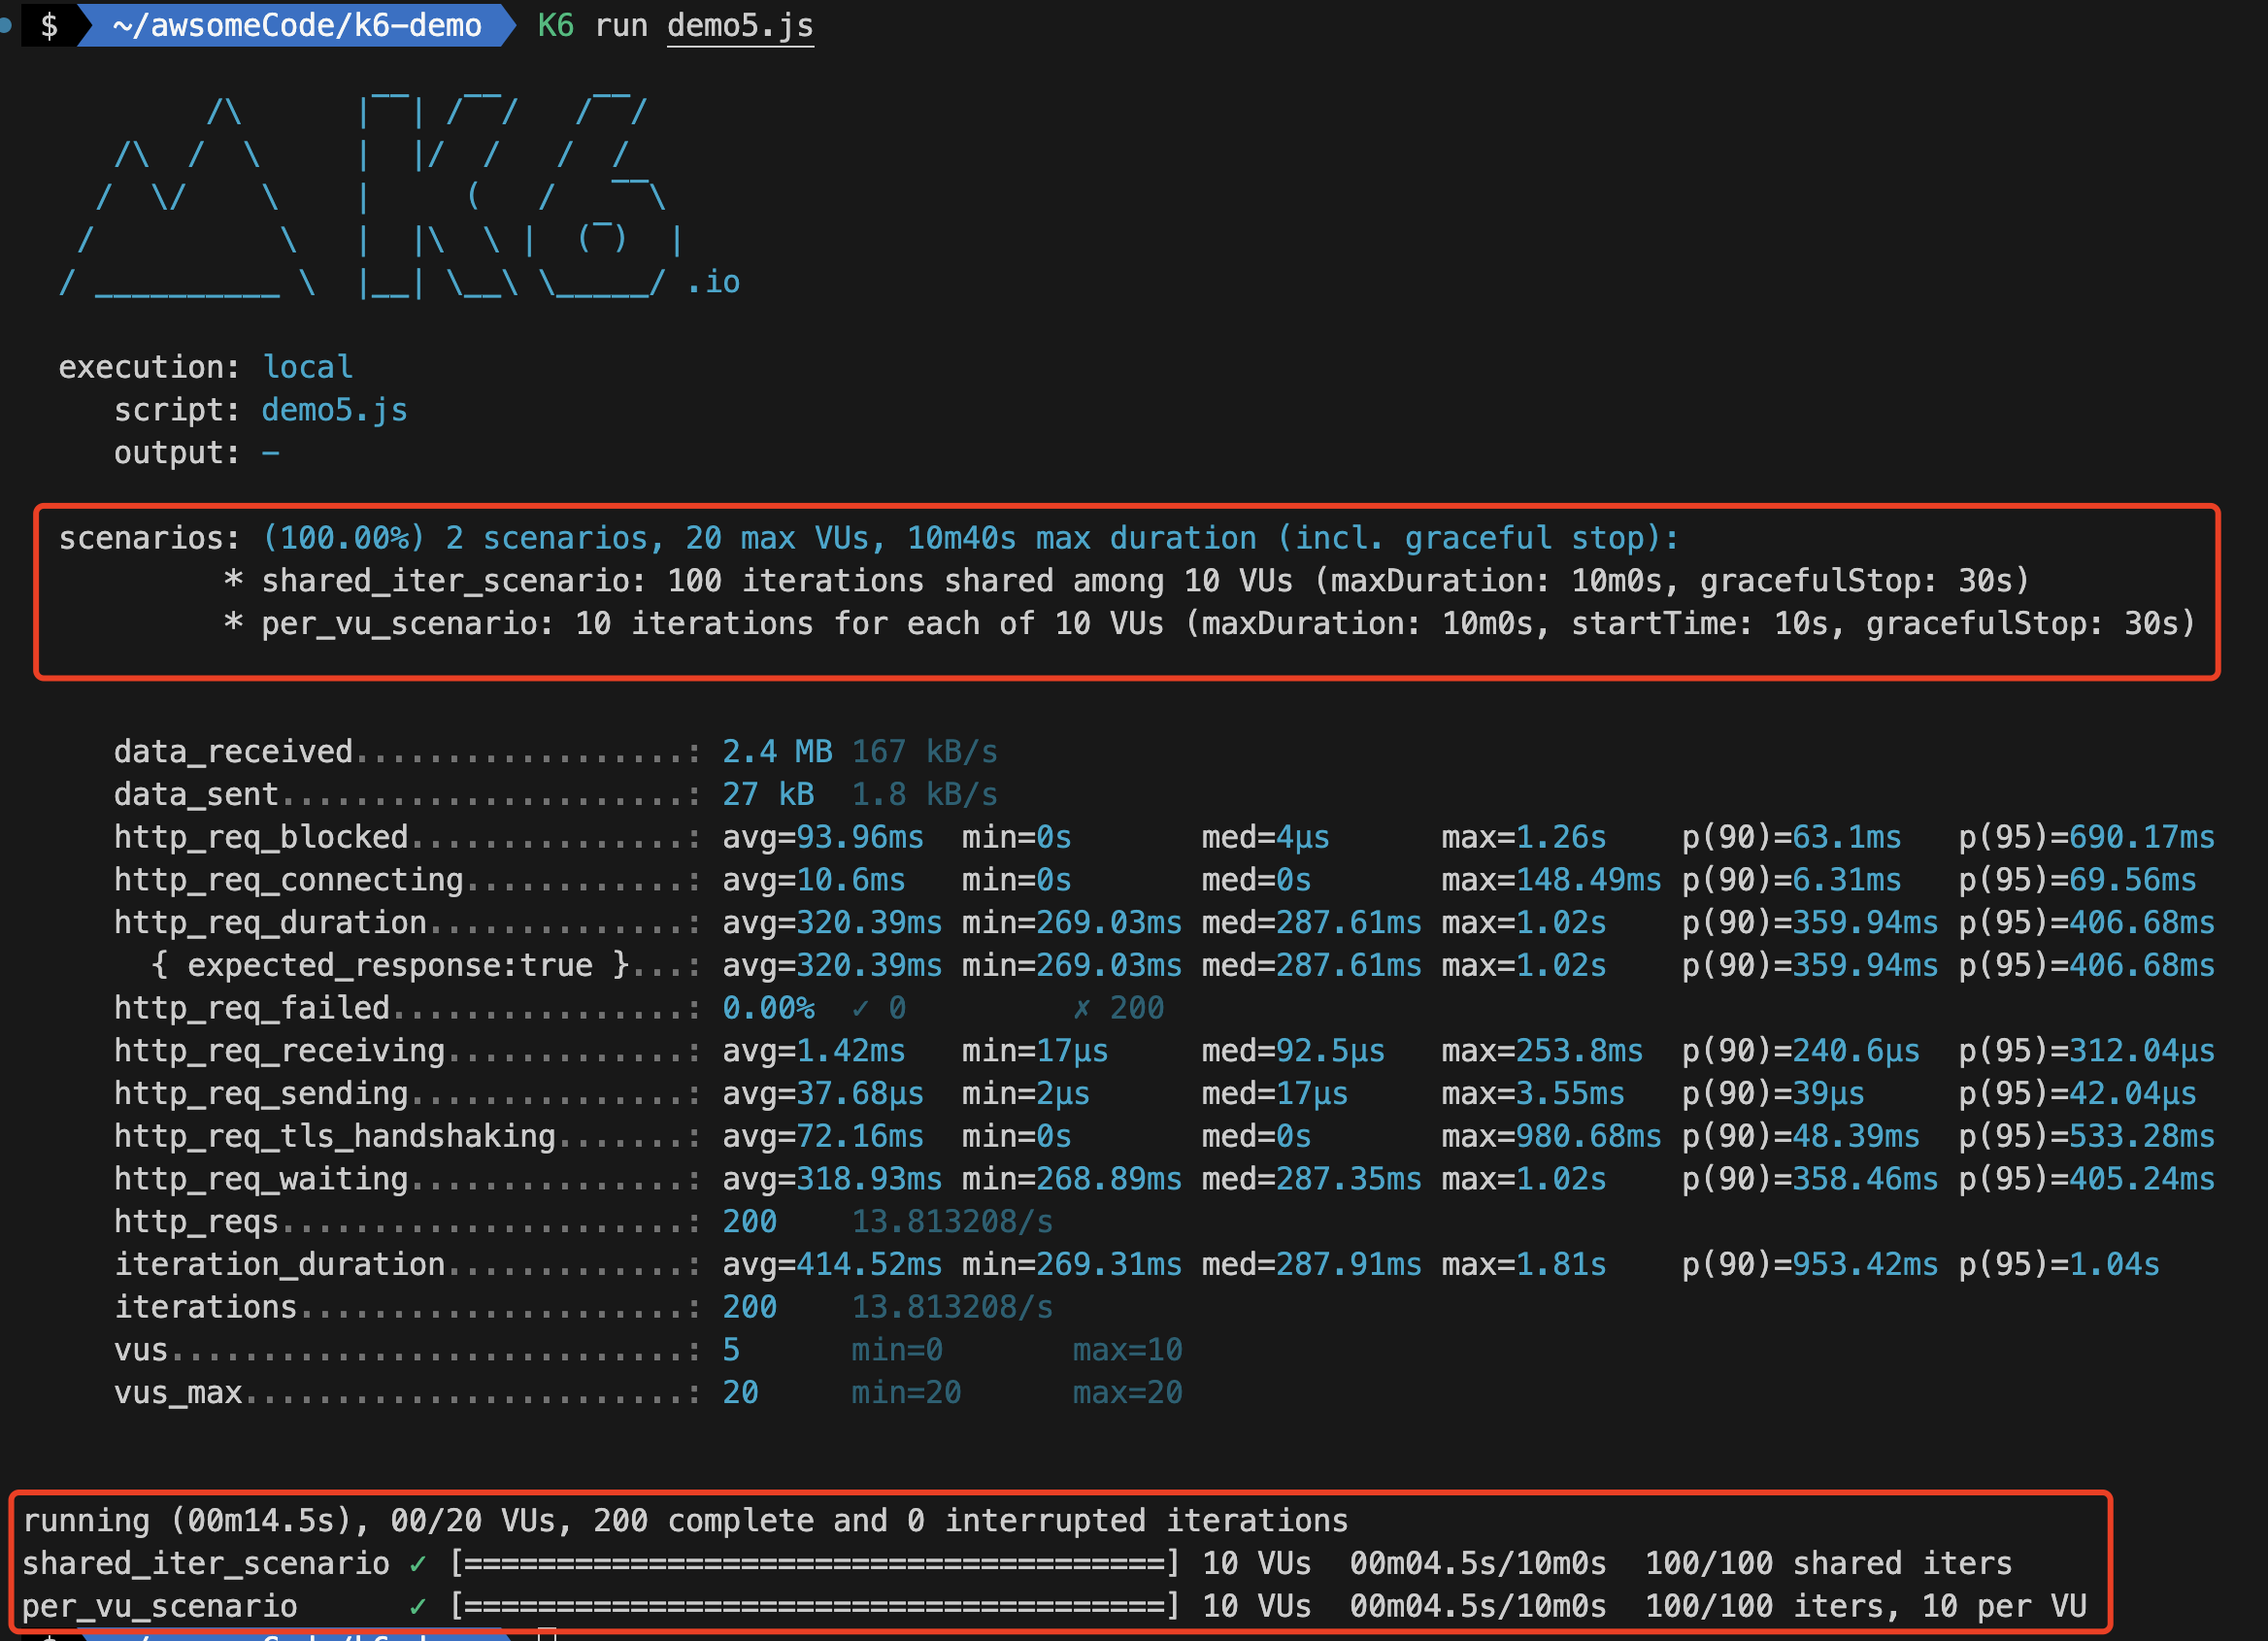
Observing the test results, you’ll find that in addition to regular test results, the k6 output will include detailed result information about demo scenarios (very detailed metric information for both shared_iter_scenario and per_vu_scenario scenarios).
For more information about test scenarios, please refer to the official documentation: https://k6.io/docs/using-k6/scenarios/
Reference Documentation
- K6 Documentation
- k6 Official Website
- K6 Performance Test Quick Start Project
- K6 Performance Testing Tutorial: Common Functions (1) - HTTP Requests, Metrics and Checks
Welcome to follow the WeChat official account “Software Testing Classmate” for original QA technical articles pushed first.